How to process and store poultry carcasses, how to properly gut a chicken after slaughter? How to smoke hot smoked fish Remove excess moisture
Guys, we put our soul into the site. Thank you for that
that you are discovering this beauty. Thanks for the inspiration and goosebumps.
Join us on Facebook And In contact with
Many of us love fish, but difficulties with cutting and short shelf life often discourage us from buying it.
website I found out what professionals advise to keep fish fresh and enjoy fish delicacies at least every evening. And also what stale fish looks like, which unscrupulous sellers are trying to sell.
1. Do not store in a bag
You should not store fresh fish in a plastic bag for a long time; this will cause it to suffocate and go rotten faster. Wax paper is best for storage, but not newspaper.
3. Be sure to gut it
Fish spoils most likely not from the head, but in general, from the insides. Before storing a whole fish in the refrigerator, it must be gutted and the gills removed. In order not to bother with your purchase, you can ask to cut it up in the store.
4. Remove excess moisture
Freshly gutted fish should be rinsed with water to remove dirt. Then wipe on all sides to remove all excess moisture. The less moisture remains, the longer the fish will last when frozen.
4. Choose the right place in the refrigerator
It is best to store fish in the coldest place possible. Signs on the refrigerator will tell you where it is. In most refrigerators this is the top shelf.
5. Place on ice
It is recommended to store fish at a temperature between 0 °C and 3 °C. But usually the temperature in the refrigerator is approximately 5 °C. In such cases, ice will help. You need to cover the fish with ice on top and bottom. But it is important to ensure that the ice does not melt - the fish will quickly deteriorate in water.
6. Use natural preservatives
Salt and lemon are also excellent natural preservatives. By salting the fish or sprinkling it with lemon juice, you can keep it fresh longer, make the meat juicy, and the taste refined.
7. Use oil
8. Refrigerate before freezing
Before putting the fish in the freezer, it is best to first cool it in the refrigerator in an airtight bag. The secret to good freezing is uniformity. Small pieces freeze more evenly than larger pieces.
9. Choose fresh or frozen
Still, you shouldn’t buy fresh fish and freeze it yourself. If you do this incorrectly, you can disrupt the cellular structure and dry it out. It's better to buy frozen right away. Industrial freezers are better than home freezers in this regard.
10. What stale fish looks like
All of the above tips will be of little help if you initially come across stale fish. Take a closer look at it before purchasing. Signs of poor quality fish:
- Strong fishy or ammonia smell - paradoxically, fresh fish hardly smells like fish.
- The eyes were noticeably sunken, clouded, and gray in color.
- The gills are dirty gray, brown, yellowish or pale in color. Possibly covered in mucus.
- The scales are dull, crumble and are easily separated from the carcass.
- The abdomen is swollen.
- The meat is easily separated from the skeleton
- With slight pressure, dents remain on the carcass, which do not smooth out for a long time.
- The carcass itself is very sticky, the fish mucus collects in clumps.
- Fillet with ragged edges, opaque, stained or bruised.
- The tail of frozen fish is curled up or appears dried out.
Frozen fish is tattered, crumpled or out of shape.
Even a beginner can cook hot smoked fish of the required quality if he adheres to certain rules. Therefore, first, familiarize yourself with all the details and learn some of the nuances of preparing a product for smoking.
Two types of smokehouses are used for smoking: fully or partially sealed. When it comes to hot smoking fish, the best option is a partially sealed device.
It is better to use a smokehouse made of stainless steel. Advantages of such a device:
- maintaining a stable temperature for a long time;
- does not corrode;
- higher sealing properties.
For proper smoking of fish, the dimensions of the smokehouse matter. The height of the correct device is 50-60 cm. The device has supports so that it can be conveniently placed above the fire. If necessary, supports are replaced with bricks or stones.
Next, pay attention to the ways of placing fish inside the smokehouse. There are two of them. The product is hung on hooks or placed on a metal grid. The set includes two grates, placed one above the other and the distance between them is at least 15 cm. The first stand from the bottom of the smokehouse is installed at least 30 cm. The device has a tray for draining fat. In this case, it will not get on the wood chips and disrupt the temperature stability. And if the chips catch fire, the fish will be protected from burning. There are small holes in the tray. Hot air, passing through them, weakens and reaches the product at the optimal temperature for hot smoking.
When smoking, it is necessary to comply with the following requirement: the smaller the dimensions of the apparatus, the weaker the heat used.
Do I need to gut fish before smoking?
Beginning smokers are concerned with the question of how to prepare fish for hot smoking - whether the carcasses are gutted before cooking or left untouched. They smoke the whole fish, but it’s better to gut the insides. Uneviscerated fish tastes bitter. It is allowed to cook fish whole if the catch is small and does not exceed the weight of 0.5 kg. If this is or, then a weight of up to 750 grams is allowed.
Gutting of fish depends on its size:
- If the total weight does not exceed 3 kg, it is allowed not to gut it. But professionals recommend getting rid of the entrails during hot smoking. There is no need to remove the scales or cut off the head.
- Fish with a large weight are carefully cleaned. There is a danger that it will not be completely smoked, so longitudinal cuts are made on it or the carcass is divided into two parts.
Once cut longitudinally, each half contains part of the head and tail. The spine is not removed and remains on one of the pieces.
They can also be cut in another way - crosswise. Then the knife is placed perpendicularly, and the pieces are formed equal in size. This way they will be able to smoke evenly.
There is no need to remove the scales. Firstly, when hot smoking without scales, the fish will fall apart. Secondly, it protects the meat from soot and makes it look attractive. The scales are removed if they are damaged in the fish.
You can also smoke hot smoked fish in a smokehouse using scrap materials. A bucket or barrel is used as a base. If this is a bucket, then sawdust or shavings from hardwood are placed on its bottom. The layer is approximately 2 cm. Don’t forget about juniper twigs or berries: it will give the fish an excellent smell and appetizing appearance. A tray is placed above the sawdust to drain grease. Since the smokehouse is made from scrap materials, a plate is placed in the bucket. It is impossible to ignore the provision of a tray, as the dripping fat will begin to burn and spoil the product.
Next along the structure of the smokehouse is the grate. It is difficult to find a round grate suitable for a bucket in the house. Therefore, we build a lattice of branches. We take the size of the twigs so that it can be placed in a bucket in a spacer. The finished grate is placed at the level of the middle of the bucket. The fish prepared for smoking is placed on the branches. The pieces are placed so that they are located at a distance of 2-3 cm from each other. Then the bucket is covered tightly with a lid. The tight fit of the lid is an important condition. In order for the bucket to stand stable, it must be placed on brick supports, and a fire must be lit between them.
Now all that remains is to provide a fire under the homemade smokehouse. We remember that for hot smoking of fish, the fire corresponds to the size of the structure. A fire that is too active will cause the sawdust to burn, while a weak one will not provide enough smoke and the desired temperature inside the unit. A very important point: do not use wood chips that are too dry. If there is no other option, then the dried fuel is sprayed with water, or preferably whiskey. As soon as smoke appears from the bucket, we note the time allotted for smoking.
Proper hot smoking of fish is directly related to maintaining the optimal temperature in the smokehouse. To do this, you just need to drop water on the lid. If the water immediately begins to hiss and evaporate quickly, the temperature in the smokehouse is higher than required. The bucket must be immediately removed from the heat for 15-20 minutes.
The duration of smoking depends on the amount of product and the size of the pieces, and the intensity of the fire also affects. Typically, the cooking time for the product ranges from 30 minutes to 1.5 hours. But if the fish is very small, then 20 minutes is enough.
If you are smoking for the first time and have no experience at all, then periodically look under the lid to control the cooking. Just do this carefully so as not to get burned by hot smoke.
Safety precautions when smoking fish
Smoking involves fire and hot objects, so safety rules must be followed. Precautions include the following:
Hot smoking of fish will go smoothly if you listen to the advice of experienced smokers. To properly prepare hot smoked fish, adhere to the following rules:
The tips presented will help even novice cooks smoke fish perfectly. The result will delight the family and friends who feast on it so much that hot smoked fish will become a signature dish in the family, and cooking using the smoke treatment method will become a pleasant tradition.

How to clean fish and how to gut fish are two of the most frequently asked questions after purchasing a seafood delicacy. Sea bass, sea bream, perch, pike perch, tench, mullet - all these types of fish are cleaned and gutted according to the same scheme, which I will describe in detail and show in a large number of photographs. You will learn very soon how to easily clean fish. The easiest and my favorite way, of course, is to buy it where you only need a seller to clean the fish :) In principle, cleaning fish is a service of many shops and markets, but, of course, these guys don’t always know how to clean fish properly, and, unfortunately, you always run the risk of finishing it at home yourself.
This has happened more than once in our family, but I was lucky: my young man is always ready to clean fish (he is from Kerch, cleaning fish is in his blood). We tried very hard to photograph and show in detail all the stages of this easy, but skill-requiring task. So watch, read and remember.
So, how to clean fish from scales and entrails. Step-by-step guide with photos.
How to clean fish? How to gut fish? How to remove gills from fish?
Many people (including me at one time) ask questions about how to clean fish quickly and whether it is necessary to clean fish at all? Of course it is necessary. And the speed depends on how many times you repeat this process. After a couple of attempts, it will start to turn out very easy, because this task does not require much intelligence.
I will show you how to clean sea bass, but this, of course, can also be dorado, perch, red fish, pike perch, and mullet. Everything your soul desires. I’ll also share a secret cool life hack on how to properly clean fish from scales at home. Let's get started.
- How to clean fish from scales? We wash the fish, take a metal mesh for washing dishes (new) and begin to scrape off its scales under running water, moving from the tail to the head (the fish is cleaned from the tail). Scrub thoroughly with a mesh, without missing a single centimeter. This method is very easy and effective, fast and convenient, but if you are looking for the answer to the question of how to clean fish from scales with a knife, then everything is also quite simple: scrape off the scales with a blade against their growth, also moving from the tail to the head.
- How to remove gills from fish? The first time it may be difficult, but, in fact, there is nothing difficult in this process. We poke holes above the gills with our fingers and trim them with a knife on one side, as shown in the photo. This can also be done with culinary scissors.

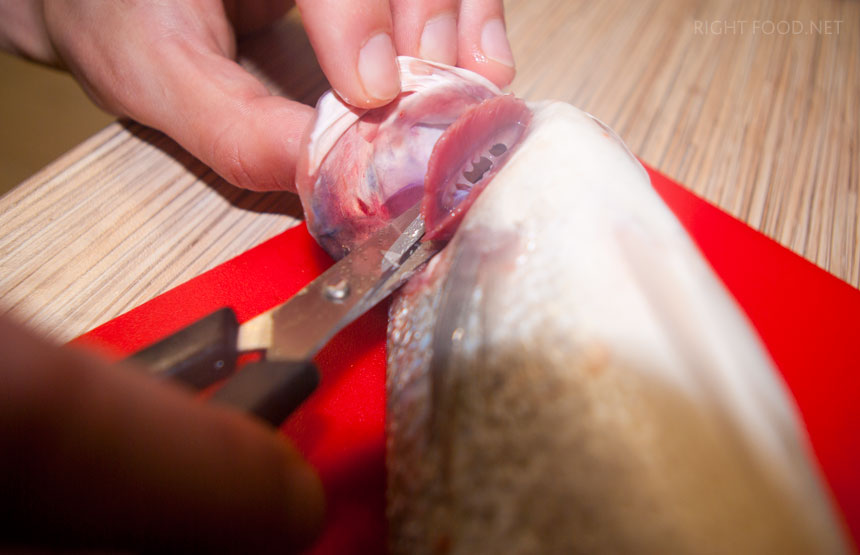
 We cut the bridle that connects the body and head.
 Cut out the last gill from the remaining side.
 We do this carefully, as you can see, there are sharp teeth on the gills that can easily injure you.
  If some of the gills remain or you cut the frenulum first, we begin to trim the gills from the back side.
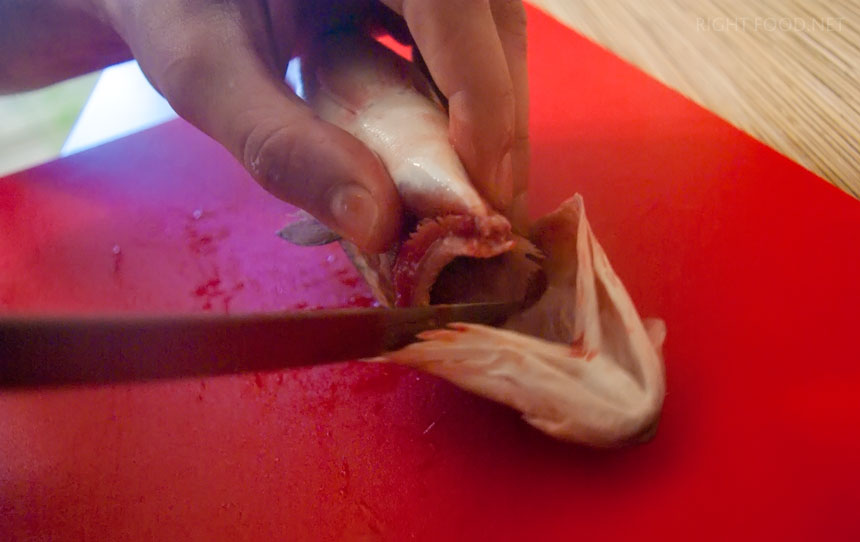
 We cut them in a circle, ending with a bridle.
  We remove the cut gills from the head. Now you know how to remove the gills from a fish without harming yourself.
- How to trim fish fins? We cut off the fins of the fish with a knife or scissors, as shown in the photographs.


- How to gut a sea bass, sea bream, pike perch or any other fish? Place the fish on its side and cut the belly: start with a small hole.

 We move towards the tail or the head (the latter option is more correct).
 We make a long cut, but it’s better not to cut all the way to the head, so the fish will retain its shape.
- How to gut fish? We take out all the insides by hand.


 Take a teaspoon and scrape off the remaining blackness.

- How to wash fish? We place the cleaned fish under running water and wash off the remaining giblets and blood.


That's all! Now you know how to clean fish from scales with a knife or a metal mesh, how to remove the gills from fish with culinary scissors, and also how to gut fish with a teaspoon. I hope you find my tips, guides, photos and life hacks useful. And further! One of these days I'll tell you how to fillet fish using the example of hung and smoked mackerel.
So as not to miss, , it's free! In addition, when you subscribe, you will receive as a gift a whole collection of complete recipes of 20 dishes, prepared very quickly, from 5 to 30 minutes! Eating quickly and tasty is real!
Try gutting and cleaning fish at home, leave comments with ratings and remember that cooking deliciously is quite simple, and that you are more talented than you can imagine! Enjoy your meal!
Compliance with the temperature regime, processing duration, and order of operations is a guarantee of obtaining a carcass completely ready for storage.
Bleeding
After slaughter, the bird is immediately hung upside down. This operation allows you to completely bleed a chicken carcass.
The time allotted for this operation is from 1 to 2 minutes. The length of time the chickens remain in limbo depends on:
- type of bird;
- type of bird;
- method of slaughter.
Pen compartment

Water temperature for processing young birds – from +51C to + 53C. Dip into water for 1 - 2 minutes. It is permissible to immerse an adult bird in hot water with a temperature from +55C to +60C for 30C.
First, remove the largest, toughest feathers from the tail and wings. Next, the abdomen, legs, shoulder area and neck are plucked. Small feathers are removed after heat treatment much easier than with the dry method.
Down and feather processing
 The feathers are sorted and sorted by size: large ones into one container, down and small feathers into another.
Feathers and down are valuable raw materials. It is used to fill mattresses, pillows (small feathers), and for sewing collars and hats (down feathers).
Feathers are cleaned in the following way:
- washed in warm water with a solution of detergents;
- rinse well to remove any remaining soap or powder;
- squeeze;
- dry for 48 hours. Recommended drying temperature: + 70C…+80C. Final humidity percentage: 12%.
You can dry your feathers well at home using large gauze bags. Fill bags with feathers and hang them from the ceiling in dry, well-ventilated areas.
During the drying process, shake the bag several times to avoid caking of the contents. To store the pen, you need to choose a room with good ventilation and low humidity.
Gutting a bird
 Before gutting, the oral cavity is cleaned of any remaining blood. The bird's throat is squeezed and, by moving your fingers, the clot is pressed out. After the blood plug has come away, the incision site is thoroughly cleaned of drops of blood.
The beak is wiped dry. A paper swab is made and inserted into the oral cavity. The beak and legs are washed well, dried and the chicken begins to be gutted.
Internal organs are removed. Most of them are used later. By-products - heart, liver, stomach without shell - are tasty and healthy. They are eaten. The lungs, esophagus, spleen, trachea, ovaries and testes are boiled, crushed and used to feed poultry.
After removing the entrails, the head is cut off along the second cervical vertebra, the legs are cut off up to the heel joint, and the wings are cut off up to the elbow joint. The processing process is completed.
The bird is thoroughly washed in cold water and left at room temperature for 2 to 8 hours. During this time, the chicken carcass cools completely and the meat ripens. It acquires a pleasant smell, becomes juicy and tender.
Post-mortem rigor in birds occurs quite quickly. It is enough to keep gutted young birds from 2 to 4 hours, old chickens - up to 8 hours. The chicken can then be eaten or stored.
Storing chicken meat
There are different ways to store chicken. There are short-term and long-term storage.
Short term
3–5 days. Chicken carcasses are placed in the refrigerator. Temperature: from 0C to -4C. If you don't have a refrigerator, remember the old way to preserve chicken. Soak a clean cloth in vinegar and wrap the meat. The fabric should remain damp.
Long-term
2–3 months or more. For long-term storage, poultry must be prepared in a special way. There are several ways to prepare poultry for long-term storage.
Methods of preparation
Freezing
Over the course of 12-18 hours, the carcasses are gradually cooled to a temperature of -2C...-4C. Afterwards they are frozen at a temperature from -12C to -18C.
Ice Shell
 During the winter, rural residents store gutted chickens in an ice crust. Nothing complicated:
- the chickens are taken out into the cold and dipped in water;
- freeze in air;
- dip again;
- freeze again;
- the process is repeated up to 4 times until the chicken is completely covered with a crust;
- wrap the carcass in parchment. Store at temperatures from -5 to -8C.
A layer of ice protects the carcass from the penetration of microbes. The bird can be stored in an ice shell for up to 2-3 months. Sprinkle the carcasses with straw or sawdust.
Be sure to take the box with the “ice chickens” out into the cold. Poultry should be defrosted gradually before cooking. This will preserve the quality of the meat.
Pickling
 A gutted carcass can be salted in a strong saline solution. For 1 kg. poultry will need 150 ml. solution.
Step by step:
- 300g of table salt is well dissolved in a liter of water;
- using a syringe, pour a saline solution through the bird’s mouth;
- bandage the neck well;
- hang the carcass by the legs;
- leave for 20 hours at temperatures +22C...+23C;
- at the end of the period, the brine is drained;
- stored in the cold.
Tip: the strength of the solution is easy to check. If the boiled chicken egg does not sink, it means you have added enough salt.
Dry pickling
With this method of salting, meat can be stored for more than six months. The prepared chicken is rubbed with salt and placed in a barrel. Each carcass is well sprinkled with salt.
Stored in the cellar. After 2-3 weeks, the bird is taken out and spices are added to the salt: black pepper, clove buds. If desired, add a bay leaf. Repeat the process of laying chicken. The barrel is put back into the cellar.
Smoking
 A popular way to store chicken carcasses for a long time. Procedure:
- chickens are salted dry, after cutting along the chest line;
- salt (1 kg) is mixed with sugar (20 g) and ground black pepper (5-10 g). This amount of salt is for 10 medium chickens. After 2 days, a load is placed on each carcass. Weight: 2-3 kg for every 10 kg of chicken;
- small birds are salted for up to 4 days, large birds for up to 6 days. The salt is washed off the carcass under cold water and dried at room temperature;
- if you want to consume meat within a short period of time, use hot smoke at a temperature of up to +80C. Maintain this temperature for the first hour. In the next 2-3 hours, reduce the heat and bring the temperature to +35C...+40C;
- For long-term storage of chicken carcasses, smoking with cold smoke at a temperature of +20C is more suitable. The process is long – up to 3 days;
- The finished carcasses need to be thoroughly wiped off soot and soot. Store smoked meats at a temperature not exceeding +5C. The room should be dry.
Canning
 Simple, fast, tasty. Cooking process:
- cut off all the fat, melt over low heat for 45 minutes - 1 hour;
- the chicken is boiled until cooked, placed in processed, steamed, clean jars;
- the prepared meat is poured with chicken fat. It covers the meat with an airtight film. If there is not enough fat, add goose or duck fat;
- white paper is moistened in alcohol or vodka, the jars are covered and tied tightly with twine. Store homemade canned chicken in the cellar.
If you are raising chickens to produce nutritious and tasty meat, be prepared from the very beginning that you will have to slaughter the bird, process it and further process the carcasses. The right psychological attitude is very important.
After slaughter, gut the bird, cut it up and think about how to store it. It would be reasonable to prepare part of the meat for use in the near future, and prepare the rest for long-term storage. Then you will be provided with valuable dietary meat for a long time.
If you find an error, please highlight a piece of text and click Ctrl+Enter.
Whether you're taking a blood-red T-bone steak out of a vacuum-sealed package, unwrapping a lamb like a gift from the paper the butcher wrapped it in, or taking a chicken out of the bag you brought it home in, does the thought of rinsing the meat under running water ever cross your mind? water before cooking?
No need. Don't ever do that. Never rinse raw beef, pork, lamb, chicken, turkey or lamb before cooking it. “But there’s something sticky on it!” you might say. No need. If we could reach across the Internet to slap you on the hand carrying (or any other) underwater, we would. Need more arguments? Fine. In fact, by wanting to clean the meat of bacteria under running water, you are only making the problem worse. This is scientific evidence: Cooks who rinse raw meat before cooking only increase bacterial activity.
Imagine all these microscopic bacteria that are located on a piece of meat. Together with water molecules, they go straight to your mouth or nostrils, settle all over the sink and even on your clothes. Every bacteria that settles on meat as soon as it comes out of the package will die during heat treatment. Unfortunately, the same cannot be said about bacteria that have taken a liking to the sink, dishes, utensils and cutting board - all of this will have to be washed with hot water and soap, then dried and wiped with paper towels before the next contact with meat. If you still have doubts, look at the recipes of any famous chefs: each of them instructs never to wash meat before cooking.
A faithful assistant in the kitchen - a culinary thermometer
To be absolutely sure that dangerous bacteria are burned off in the fire of your frying pan, use a food thermometer. Once the internal temperature of the meat reaches 55 degrees Celsius, you can be sure that nothing inside this delicious piece will threaten your health. For added safety (and flavor), be sure to let the marbled meat rest for at least three minutes before cutting into pieces.
Another argument against: by disturbing the molecular composition formed on the surface of the meat with a stream of water, you complicate the Maillard reaction - a chemical reaction between amino acids and sugar that occurs when heated. In other words, the meat will brown worse when you put it in the frying pan and will lose its unique aroma and taste. The Maillard reaction begins at approximately 110 degrees Celsius. Water, which begins to evaporate at 100 degrees, simply does not allow the meat to heat up enough for the Maillard reaction to begin. This means that a “wet” piece of beef will not begin to brown until all the water has evaporated - and by this time it will already be well-done.
Do not rinse meat before cooking.
So - do not rinse the meat before cooking. In fact, once you've picked it up from the butcher, wrapped in plastic or paper, and unpacked it at home, all you have to do is carefully remove any remaining moisture from its surface with paper towels before putting it in the pan. . And then throw away those towels and wash your hands thoroughly - for at least 10 seconds under hot water and soap.