How to set up studio light. Pulsed light in the studio: how to work. Looking for the Guide Number of the Flash
136522 Studio photography 0
This is still an interesting topic - shooting in a photo studio: studio light, lighting schemes, examples of use... If you search on the Internet, you will find many articles on this topic.. But first, let’s remember what types of light are used in photography.
Studio (or also called pavilion) photography is carried out indoors using artificial lighting. The number and power of the light sources used must correspond to the amount of illumination required to obtain a high-quality image. In accordance with these requirements, the luminous intensity of lighting devices and their placement are adjusted, which allows solving compositional problems, obtaining lighting effects of different nature.
Types of light sources
Plays the main role in the formation of objects painting light , revealing their sculptural and volumetric plasticity. By skillfully using such light, the photographer can highlight the most important elements of the composition and leave minor ones in the shadows. The ratio of light and shadow, i.e., the creation of light balance, is also determined by the strength of the source of key light, which is created by artificial lighting with directional light devices.
If the shadows created by the painting light do not carry a decorative principle or semantic meaning, they can be highlighted fill light . It is created by diffuse light sources and, together with other types of lighting, primarily modeling light, determines the degree of contrast in the image. Fill light evenly illuminates subjects and the room, creates the level of illumination necessary for satisfactory detail, and does not create visible shadows.
Modeling light performs the functions of additional fill light (illumination of shadows), for which weak diffused light devices are used. The lower modeling light softens and smoothes out sharp shadows from the main (drawing) upper light source. Modeling light can emphasize the plasticity of volumes, creating on them a play of glare and reflexes, that is, local reflections from various parts of surfaces and surrounding objects, and their shape, color and intensity can be adjusted.
Background light serves to illuminate the background, for which diffused light devices are usually used.
Contour light creates a light contour around the subject being photographed. This outline should be brighter than the lightest part of the illuminated object and the area of the background onto which it is projected. Contour light can become an expressive part of the composition.
Spectacular light will create highlights and shadows of a given shape, color and intensity on the elements of a photo composition, usually reproducing the effect of a powerful light source located above the boundaries of the frame.
Leveling light illuminates the shadow parts of the subject and never creates shadows in areas illuminated by the main directional or key light.
When shooting, you almost never use all types of lighting at the same time; two or three are enough.
“The most powerful light source, which determines the nature of the lighting, creates the main key light; illumination of the shadow areas of the object is provided by a source of diffused, filling light. Backlight is often used, effectively outlining the contours of objects with light highlights. In some cases, the background is illuminated separately, for which a background light source is used. Modeling light can also be used to help expressively illuminate individual areas of objects.
To use these five types of lighting, you need five light sources. But in most cases, two or three lighting fixtures are sufficient for the main, fill and backlight, provided that the selected background is light, is located close to the subject and does not require special lighting.”
A. Simonov, Soviet Photo magazine, August 1968
When working with artificial light, the photographer must keep in mind four characteristics of lighting: 1) illumination of the subject being photographed and the entire space; 2) lighting contrast; 3) the direction and size of shadows, i.e., shaded areas of the surface of the object being photographed; 4) the spectral composition (color) of light falling on the surface of the object being photographed.
Speaking about illumination and contrast, it is necessary to remember the peculiarities of visual perception, for which not only the amount of illumination is important, but also the ratio of brightness of individual sections of the composition being photographed. The human eye distinguishes between brightnesses if they differ from one another by at least 10%. Therefore, in order to reproduce the light and shadow gradation visible to humans, it is necessary to correctly pronounce the exposure metering of illuminated and shadow areas.
It is necessary to learn how to correctly use the direction of light and the size of shadows. There are countless options for illumination with artificial light sources - from the subtle, airy, shadowless image created by fill and modeling light sources, to the black contrasting cut-off image obtained using only one key light.
Using directional light sources, you can create an expressive light and shadow pattern. A soft, transparent shadow will make the drama of the photo less conflicting. A sharply expressed chiaroscuro, in which some objects or parts thereof are immersed in shadow, while others, on the contrary, are brightly lit, will introduce elements of dramatic tension into the composition of the frame and make the frame more expressive.
By skillfully using contrasts of light and shadow, you can achieve completely different effects - from picturesque richness to the harsh sharpness of a poster design.
As already mentioned, in order to create a certain type of lighting, it is necessary to correctly select the lighting devices needed for this and install them correctly. There cannot be a universal light installation scheme for any type of photography, since the choice of lighting is dictated by the individual creative tasks of the photographer and the various plastic features of the depicted objects. Therefore, we provide only a general scheme, which should vary in each individual case. We will look at some of its options in this lesson below.

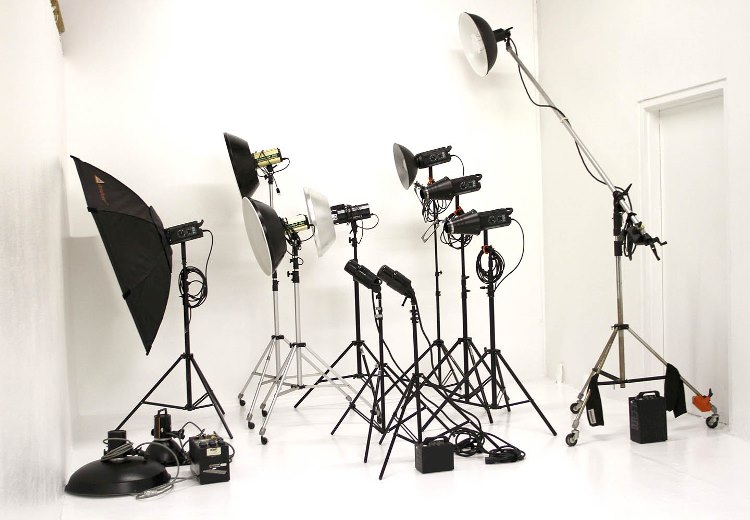
Equipment for pavilion photography
Some of the most common attachments for studio lighting equipment include:
— Umbrellas - This is a very convenient attachment that can be attached to almost any lighting fixture. As a rule, umbrellas have a diameter of 80 to 120 cm. There are translucent umbrellas, which help to diffuse and attenuate the light coming from the flash lamp by almost half, and umbrellas with a reflective surface. The latter have an outer surface of black fabric and an inner surface of fabric of various colors. Depending on the color of the fabric on the inside of the umbrella, you can receive one or another light. For example, the matte white surface of an umbrella provides the photographer with very soft light, while the golden color of the fabric increases the temperature of the light.
 — Beauty plate.Thanks to the design feature of the “beauty dish,” the light is both concentrated and soft. That is why this attachment is used when shooting portraits. Also, the “beauty dish” effect can be supplemented with honeycombs or soft attachments.
 — Reflectors
. One of the most commonly used attachments for studio photography is a reflector, which allows you to limit the light flux along the angle of propagation and concentrate it in the desired direction. Reflectors come in different types - standard, background, diffuse and umbrella. Umbrella reflectors are used when shooting together with umbrellas, and their main task is to direct the reflected light onto the working surface of the umbrella. Background reflectors help the photographer illuminate the background evenly, and diffuse reflectors, reminiscent of satellite dishes, are necessary to ensure that the hard light from the flash does not fall on the subject. In addition, a variety of parabolic reflectors are available on the market today, which are used to limit light to a certain angle.
— Reflectors
. One of the most commonly used attachments for studio photography is a reflector, which allows you to limit the light flux along the angle of propagation and concentrate it in the desired direction. Reflectors come in different types - standard, background, diffuse and umbrella. Umbrella reflectors are used when shooting together with umbrellas, and their main task is to direct the reflected light onto the working surface of the umbrella. Background reflectors help the photographer illuminate the background evenly, and diffuse reflectors, reminiscent of satellite dishes, are necessary to ensure that the hard light from the flash does not fall on the subject. In addition, a variety of parabolic reflectors are available on the market today, which are used to limit light to a certain angle.
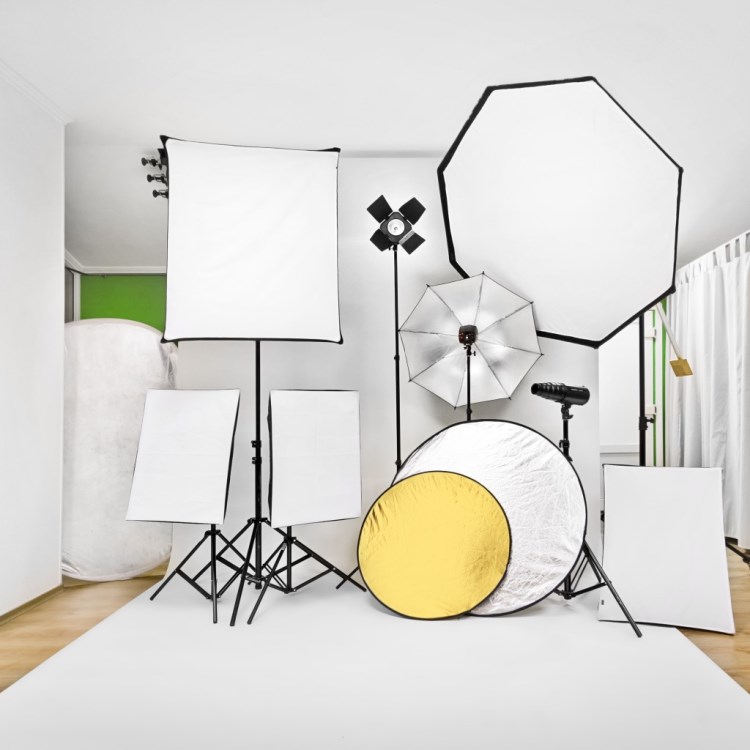
 — Soft boxes
. The design of the soft box consists of a lightweight metal frame, which is covered with thick fabric. Moreover, the inner part of the fabric (metalized layer) takes the shape given by the frame and becomes, in fact, a reflector that reflects the light flux onto a quadrangular diffuser screen. This diffuser screen is a special piece of fabric that scatters light well, but practically does not affect its spectral composition. Quite often, soft boxes are used in studio photography to create key and fill light, as well as to obtain uniform soft illumination of the subject being photographed.
— Soft boxes
. The design of the soft box consists of a lightweight metal frame, which is covered with thick fabric. Moreover, the inner part of the fabric (metalized layer) takes the shape given by the frame and becomes, in fact, a reflector that reflects the light flux onto a quadrangular diffuser screen. This diffuser screen is a special piece of fabric that scatters light well, but practically does not affect its spectral composition. Quite often, soft boxes are used in studio photography to create key and fill light, as well as to obtain uniform soft illumination of the subject being photographed.
 Long soft boxes, the length of which is several times greater than the width, are called strip boxes, which are most often used to illuminate full-length models, as well as when photographing large objects. Strip boxes (also called strips) are great for creating long, narrow highlights on reflective surfaces. Octo-boxes are octagonal soft boxes of large diameter. Used as a key light for group portraits. In portrait and product photography, they give a round shape of highlights in the eyes of models or on glossy objects.

 — Tubes and honeycombs
. Other attachments for lighting equipment used in studio photography include tubes and honeycombs. Tubes are conical-shaped nozzles that allow you to limit the light flux to a narrow, directional beam of light. With the help of such an attachment, the photographer can highlight the desired detail with light and place certain accents. Honeycombs are nozzles with a fine-mesh structure that help create a beam of light consisting of almost parallel rays.
— Tubes and honeycombs
. Other attachments for lighting equipment used in studio photography include tubes and honeycombs. Tubes are conical-shaped nozzles that allow you to limit the light flux to a narrow, directional beam of light. With the help of such an attachment, the photographer can highlight the desired detail with light and place certain accents. Honeycombs are nozzles with a fine-mesh structure that help create a beam of light consisting of almost parallel rays.
— Constant light sources . In addition to pulsed illuminators, constant light sources can also be used in studio photography. Continuous light sources are often used in product photography, when traditional flash units cannot provide the photographer with a normal exposure during the duration of the pulse. Constant light sources are also used to more accurately assess the distribution of light, shadows and highlights when composing a frame, which is sometimes difficult to do when using conventional pulsed illuminators. Many professional photographers generally believe that constant light sources are preferable to flashlights for portrait photography.
 —
Racks
designed for mounting various equipment, placing it in the studio and adjusting it in height. Crane - a stand with a crane and a sinker for installing lighting fixtures, designed to support any weight, including soft boxes and octo boxes.
—
Racks
designed for mounting various equipment, placing it in the studio and adjusting it in height. Crane - a stand with a crane and a sinker for installing lighting fixtures, designed to support any weight, including soft boxes and octo boxes.

— Other equipment . The range of equipment used in a professional photo studio is very wide. For example, the same fans not only serve to cool lighting equipment. Special tunnel fans with adjustable rotation power help make the model's hair flow in the photo and her clothes flutter in the wind. Working with lighting equipment requires synchronizing it with the camera. For this, in particular, a so-called IR trigger is used, which is attached to the location of the camera’s external flash. The IR trigger synchronizes the lighting equipment and the camera via an infrared pulse, thereby ensuring that the camera shutter opens and the light pulse occurs simultaneously. Synchronization can be carried out either by wire or by means of a radio receiver connected to a light source (the transmitter, accordingly, is connected to the camera).
For studio photography, a photographer will also need good optics. In particular, for product photography you will need a macro lens that allows you to shoot from a very close distance and is characterized by maximum sharpness and detail. Shooting in a studio environment also allows the photographer to create truly unique conditions with voluminous atmospheric scenery and smoke. For this purpose, the studio uses a fog generator, which makes it possible to create fog of the desired density in the room, acting as a background.
Only well-chosen studio equipment opens up a wide field for the photographer for all kinds of creative experiments, the embodiment of his plans and the effects of professional photography. In a studio setting, you can organize a wide variety of lighting schemes and create fog or wind. You just need to be able to work with a variety of photographic equipment and lighting equipment.
Examples of lighting settings when shooting in the studio
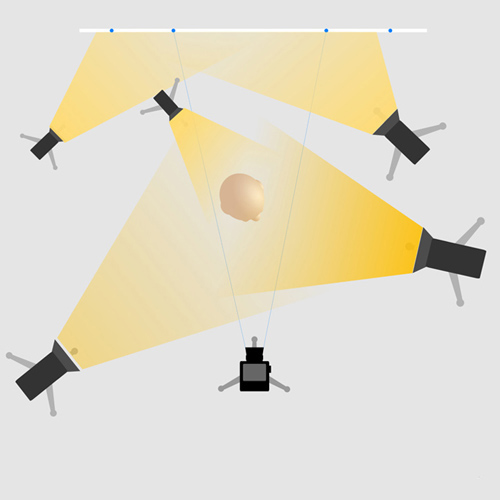
The studio lighting diagrams presented in this lesson are not dogma or direct guidance, they are shown only as an example and can be used differently at the discretion of the photographer. These schemes use a minimum number of light sources.
1. Classic lighting scheme with 3 light sources
Option 1: 3 pulsed light sources - 2 soft boxes and a flash with reflector.
An octo-box was used as the main (drawing) light source. Considering that the octo-box, as a type of soft box, provides soft, diffused light over a large area, there is no need for fill light.
The use of a white background is due to the desire to highlight the subject without being distracted by details. The background light seems unnoticeable, but illumination from the shadow side opposite to the key light, evens out the brightness of the background. A similar arrangement of studio equipment, with minor modifications, is used in stock photography and for high-key shooting.
Option 2: 3 pulsed light sources - octo-box, vertical strip-box and light head with reflector.
Still the same standard lighting scheme. For additional illumination of shadows, instead of the fourth source, you can install a reflector.
A model in white clothes stands out well against a colored background, although it is more suitable for artistic or glamor photography. It may not be worth it to lighten the background, given the white clothes. However, thanks to this lighting, the background turns out to be non-uniform and “plays”. The contour on the shadow side of the model also highlights the silhouette. Background and contour light are used to create effects, and the use of such lighting makes the photo more “tasty.”
2. Lighting scheme with 2 sources
Option 1. Light background. The model is located near the wall. The fill light source is a large octo-box located on the crane above the model. The key light is a vertical strip box located approximately 45 degrees to the optical axis of the camera.
Option 2 similar, but the background is neutral or dark, and the key light source is rotated so as to shine from the side. In the studio, this kind of light is called sliding light. Side lighting works best to bring out the texture of a surface, such as fabric, in clothing display shots. The image is more contrasty, and the contour is emphasized with backlight, placing it behind, above and to the side of the model at 45 degrees.
3. Shooting with a parabolic umbrella
A giant parabolic umbrella (approx. 180 cm in diameter) stands in the center of the photo studio. The color of the reflective surface is white. The umbrella design is on wheels with a counterweight, and the light head can be moved along the axis, achieving various effects.
On scheme 1 you can see how the bright light highlighted the model from both sides. The large size and shape of the back reflector provides soft, uniform illumination that serves as both a key and fill light. The characteristic round glare from the umbrella is well suited for portraits. When shooting close-up, a brightly lit circle with spokes is visible in the reflection of the eyes.
Pulsed light from the reflective surface of a parabolic umbrella itself has an “enveloping” effect. This umbrella is ideal for portrait photography, as well as dynamic shooting of a model in motion.
Scheme 2 for shooting in a studio against a light background: a large-diameter parabolic umbrella and backlighting with two strips. To separate the model from the background differently, you need to make the background brighter. 2 vertical strips were used to illuminate the background evenly over the entire height. The power of the sources is maximum. The light from a parabolic umbrella turns out to be voluminous. It works well on the texture of leather and fabric, drawing out details, and therefore is indispensable for fashion photography, clothing catalogs and stock photos.
4. Scheme of shooting on a white background for stock photos
A special feature of shooting for stock photos is isolating people or objects from the background. Typically a white background and additional lighting are used.
Scheme 1. Octo-boxes on the sides of the model, one of which is on top of the crane, were used as sources of key and fill light.
To prevent a white background from looking gray, you need to light it evenly. For this purpose, 2 vertical strip boxes were used, one on each side. The pulse power of the background light must be sufficiently large or maximum. The same as the drawing one, although the drawing one can be slightly reduced. An additional nuance of this light scheme is the use of the background as a reflector and backlight. If the model is in close proximity to the background, then a bright light contour is formed around it, and the figure is drawn.
Scheme 2: For a chest portrait, you can use this setup when the background is lit by the large octo-box on the crane.
5. Lighting scheme on a black background
Let's consider a scheme for shooting a contrast portrait in the studio, on a black background, using two light sources. To create a rigid pattern of light and shadow, special attachments with honeycombs were used. And the tube will serve as a source of accentuating (sometimes called sculptural) or modeling light.
Modeling light - located along the axis of the modeling light, and is located on the opposite side of the model. It “tears” the unlit half of the model from the background. It does not have a clear pattern and does not compete with the coloring light. If installed incorrectly (for example, excessive brightness), it can disrupt the entire light palette. If the photographer “does not see” or does not understand the modeling light, then it is better to refuse it. Due to the fact that the light from the modeling light source can fall on the front lens of the lens and reduce contrast or cause unwanted glare, it is installed in a tube, or the light source is equipped with protective curtains.
Light scheme 1: Two pulsed light sources - a honeycomb beauty dish and a honeycomb tube.
The specific nature of lighting that a portrait reflector creates differs from soft boxes or umbrellas, since the flow of light is distributed evenly on the reflective surface. To obtain softer light, a diffuser is used, and to obtain directional light, honeycombs to the size of the plate are used.
A honeycomb tube is an attachment used in portrait photography to create a highlight or highlight hair. Lighting with a point light source, such as a tube, requires more careful and careful placement of the flash.
Scheme 2: The photograph shows how a poorly placed modeling light source affected the character of the drawing.
The key light source is located at 45 degrees to the model in front and slightly above, and the modeling light source, on the contrary, is at an angle of 45 degrees and above behind the subject. The result is a contrasting portrait that stands out well against the black background.
6. Light diagram from two sources with a color filter
The highlight of this two-source design is the use of a color filter on the rim light. A small octo-box creates a basic light-shadow pattern and gives a white (cold) tint. And the orange filter of the reflector, located behind, to the side and above the model, illuminates part of the face and dress with warm yellow light. The pattern turns out so fashionably golden. The resulting overall golden lighting softens the image.
If you want to make the tone cooler, and the colors of your skin and dress more natural, you can adjust the white balance or post-processing. Although this may ruin all the romance of the lighting. Initially, the white balance was set to 5560 K; to “cool” it, you can reduce the temperature to 4500 K.
This concludes this lesson. Complex, the full understanding of which comes only with practical experience, which we wish you, our dear readers, to acquire as soon as possible.
In the next lesson No. 3 you will learn how to set up your camera correctly for shooting in the studio. All the photography to you!
Theory of photography
Types of lighting:
Drawing is the main source of light that creates a light-and-shadow pattern. The power of the key light source should always be greater than the fill light. As a rule, the difference between the shadow and illuminated sides for color photography should be 1-1.5 steps, for black and white. photo - 2 steps and more. For a family portrait, the fill light should be slightly weaker than the key light to avoid harsh shadows. Key light can be used as the only light source, or combined with others.
Fill – installed after the key light is installed. Serves to fill individual parts or the entire subject with light, as well as soften shadows.
Modulating - used to highlight the sides of the subject, highlight hair, shoulders and separate the subject from the background. Depending on the purpose and creative ideas, modeling light can be soft or hard.
Backlight – illuminates the object from behind, separates it from the background, and highlights the outline.
Background – used to highlight the background. The background light seems to separate the subject from the background, creating a sense of volume.
The direction of light can be frontal, diagonal, side, rear-diagonal, back.
2. Scenic light
We move the device from the front to the diagonal position and get picturesque light. In this case, the shadow from the model’s nose goes slightly to the side.


3. Triangle
We continue to shift the light source to the side until the shadow from the nose merges with the shadow from the cheek, forming a light triangle. When you turn your head in one direction or the other, the triangle expands or contracts. As the height of the light source changes, the triangle also moves up and down.

4. Shadow and light-tonal half-turn
With this light scheme, the subject's face is turned three-quarters away from the camera. The drawing source, located in a lateral position, illuminates that part of the face that is located further from the camera, and most of the face, located closer to the camera, remains in shadow. A light-tonal half-turn is the same as a shadow half-turn, only a reflector is installed on the camera side to create a translucent shadow.

5. Modulation
The source is in a posterior diagonal position, with a narrow stream of light passing along the cheek of the subject. A directed stream of light can be created using a tube or curtains.

6. Backlight
The light source is located behind the model. Backlight is used when it is necessary to convey a clear outline of an object, rather than its volume.

7. Fireplace light
In this scheme, the light source is located below the model’s face, almost on the floor. This position allows you to imitate the light from a fireplace or fire. The face of the subject is illuminated from below at an angle of 45 degrees. The light source can be directed into a gold reflector, which creates a more natural yellowish tint to simulate fire.
8. High and low key
High key. The light source is installed frontally, just above the model’s head; you can install a second source from below at an angle of 45 degrees. This scheme allows you to achieve soft, uniform, almost shadowless lighting. We place two strips behind us that will highlight the white background. The power of the sources should be 1.5 - 2 steps higher than the main light. Those. in other words, we simply overexpose the background so that it looks dazzling white.

Low key. In contrast to high key, dark tones predominate in the photograph - the background, the model’s clothing, and minimal lighting. A photograph taken in low key evokes a sense of drama. More often, one light source is used, highlighting individual parts of the object (the semantic center), for example, a face, rather than the entire object.

Studio photography is becoming more and more popular every year. It’s not surprising, since in a photo studio you can recreate any conditions for a good photo. Also, there are no external negative factors that can ruin the picture. But creating a high-quality photograph in a photo studio is also not easy. There are a lot of nuances that must be taken into account.
Even novice photographers know how important the correct lighting for a photo studio plays when creating a photograph. It can either highlight the best in the photo and take masterpiece pictures, or completely ruin the appearance of a seemingly ideal model. Proper lighting practically ensures and guarantees a high-quality photograph.
Types of lighting in a photography studio
There are several types of lighting in a photography studio. The main ones:
- Hard lighting. It features deep shadows, making the photo brighter and more saturated.
- Soft lighting. It is characterized by the absence of pronounced shadows and is evenly distributed throughout the image.
There are also two types of studio lighting:
- Black and white. With this choice of lighting, the texture and shape of the object that will be in the picture stands out well. This option is better suited for shooting inanimate objects. Reflectors (read about them here) and tubes are used for this effect.
- Tonal. Does not create sharp, rough shadows; created using photo umbrellas and softboxes. Often used for portrait photography.
According to its purpose, the light in the studio can be drawing, filling, background and backlight and modeling.

Classic lighting design for a photo studio
Drawing. Key light is the main and most important light in a photography studio. As a rule, it is the brightest of all sources. It perfectly highlights the necessary features and details in the photo. Key light can be hard or soft. It is usually placed in front of the object and to the side.
Filler. This light makes the shadows a little softer, makes the photo less saturated and contrasty, and adds tenderness and warmth. The fill light is placed behind the main camera or next to it. This light is created using soft boxes or reflectors.
Background. This light is mainly needed to separate the background and foreground, to create some space between them. Background light gives the image greater depth and the desired volume.
Typically, this effect uses hard light sources that are installed to illuminate the background. Curtains, filters, etc. are also used.
Back-up. This light exists specifically to create accents on desired details or objects. Thanks to backlight, you can highlight the desired item in the photo. Often used in advertising shoots. Its location changes depending on what exactly the photographer wants to highlight.
Modeling. This light illuminates individual areas of the photograph and creates the necessary highlights.
Main light sources
Studio lighting is created by many types of lighting equipment. The main sources are divided into impulsive and constant light sources.
Pulsed light
These are short-term flashes, used only in photography. This source creates a very powerful pulse of light during shooting. Basically, pulsed light is created using two light bulbs: one is a regular halogen light bulb, and the second is a pulsed light bulb, which brightly illuminates the object in the photo. Note that the use of halogen lamps is only possible with a step-down transformer, which read about.
There are impulse lamps for a photo studio: monoblocks, which are powered from the mains, consisting of a power supply, a lamp and a storage device and control in one powerful housing, and generator systems, in which the lamps are located separately from everything and are connected by wiring. Such systems are very convenient for a photography studio, since you can simultaneously adjust light sources that can be located in different, often hard-to-reach places.
Pulsed light sources for photo studio
Constant light
It is used both when creating photography and when filming video. It has its advantages, since the photographer is able to see the entire image in constant light.
Constant light is used extremely rarely, as it consumes a huge amount of electricity and carries a large amount of heat in the literal sense of the word.
Sometimes it is used to create photos of inanimate objects.
As a rule, constant light sources for a photo studio are. They are also often used, but you should carefully select them, since low-quality bulbs exhibit flickering, which, although not noticeable, can affect photography. The most economical option for constant light are. Not only do they have many advantages over their analogues, but they can also be easily adjusted in brightness thanks to the built-in dimmers, which you can read about in.
Most photography studios use impulse lighting. But there are also passive lighting equipment. This is a lighting kit for a photo studio, which includes reflectors (fabric stretched over a durable frame), they themselves are not a direct source of light, but they reflect it. Also used in the photo studio are various attachments that create light. Most often, umbrellas that provide soft light, softboxes and octoboxes (reflectors of different shapes) are used to diffuse light. Also popular are colored curtains that regulate flash power, lightboxes in which shooting is carried out, and tripods.
Passive lighting equipment for photo studio
How to evaluate the correctness of the constructed lighting exposure
To obtain high-quality photographs, you need to correctly build the light exposure. To assess the lighting arrangement, the following devices are used:
- Exposure meter - shows the properties of aperture and shutter speed in pulsed flashes, not relevant with the transition to digital technology.
- Flash meter - shows the correspondence between the strength of the leading and fill flashes, works with impulse lighting.
- Brightness histogram – a graph of brightness divided into halftones. With its help, you can determine how to improve the photo.
- Overexposing areas - helps to determine areas where there is too much light and using this data you can adjust the power of light sources to obtain better images.
How to set the light in a photo studio
Many professional photographers believe that they have not yet come up with the ideal lighting scheme for lighting in a photo studio. Today there are thousands of different ones. Based on the basic schemes, the photographer himself must adjust the level of lighting. But, nevertheless, there are several classic, time-tested options for how to set up light in a photo studio.
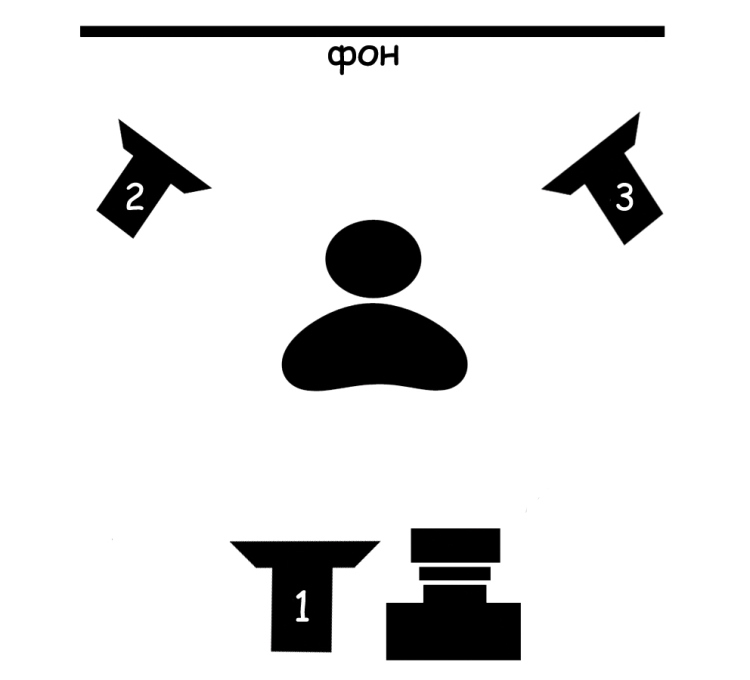
Hollywood
The most common lighting arrangement in a photography studio for portrait photography. It is quite simple, convenient, and is often used successfully for years without changing anything. It is also suitable as a basis for beginning photographers, since its implementation uses a small amount of equipment and does not require much time. Perfect for standard, no-frills photos.
In the Hollywood lighting scheme, photography studios use a key light, which is installed just above the head and slightly to the side. The angle between the person being photographed, the camera and the light source from the side should be 45 degrees. Pulsed lighting devices that are located behind the photographer are also used. The power of this light should be several times less than the highlighting light. The required power level is determined experimentally.

Hollywood lighting design
High key
In this lighting scheme there are practically no coarse shadows, tones that are used are very gentle and light. The necessary equipment includes a key light above the camera and two background illuminators, which are set higher in exposure than the previous source. They are located behind the model and are aimed exclusively at the background.
A distinctive feature of this lighting option is the huge amount of bright light from all sides.
This is an excellent choice for studio filming of small children, happy families, and cute animals. It is also often used to create nude photographs.
“High key” lighting scheme
Low Key
Creates the necessary dramatic atmosphere and adds mystery. With this lighting scheme, a dark background is used. A maximum of two lighting sources are included. They use back accent light, which is most often installed on the side. This lighting scheme is often used to create scary scenes, such as horror films, depressing photographs and isolated lines of naked body.
Proper and good lighting is the key to high-quality photography. With the right choice of lighting devices, even a novice amateur photographer will be able to create unique photographs that will fascinate with their beauty. This is especially important when shooting in a photo studio. High-quality lighting will help you create masterpieces in the world of photography.
Every photographer knows that light is the most important tool when creating a great portrait.
Below I offer for consideration a simple classification of studio lighting schemes that will help you achieve excellent results. Types of light sources
Painting light
The main and powerful light source that creates hard (reflector with shutters) or soft shadows (diffuser, softbox, umbrella, reflector).
Fill light
Additional lighting sources with softboxes, diffusers, etc. You can also use reflectors, background light, and backlight for a fill effect. Often shutters are used to allow you to control which areas to illuminate and which to leave in the dark.
The procedure for setting the light in the studio
First of all, you must set the background light and then set the backlight. This order will allow you to see the effect produced by these light sources. The next step is to install the fill and then the key light. It is also important to know what effect each light source gives; to do this, turn the flashes on and off one by one. And you will definitely get a result that will satisfy you.
There are several types of illumination of the model's face: wide light and short light (front, side, and various options thereof)
Wide light - full illumination of the side of the face aimed at the camera

Three-Quarter Lighting: Wide Type
Universally positioned key light for formal photography. The light source is placed near the camera to illuminate the side of the face facing the camera. Shadow is minimized. This is the most suitable type of lighting for normal and narrow faces.

Paramount (glamorous light)
This type of light is named after the Paramount studio and is also known as butterfly, Hollywood or glamor light. This is a soft and “feminine” highlighting light aimed directly at the model’s face and allows you to idealize her skin as much as possible. The drawing light is placed on the right above eye level, the filling light is there, but below the drawing light. You can also use a reflector on the side of the model. This way we will form a symmetrical shadow from the nose, which should be no more than half the length of the lips.

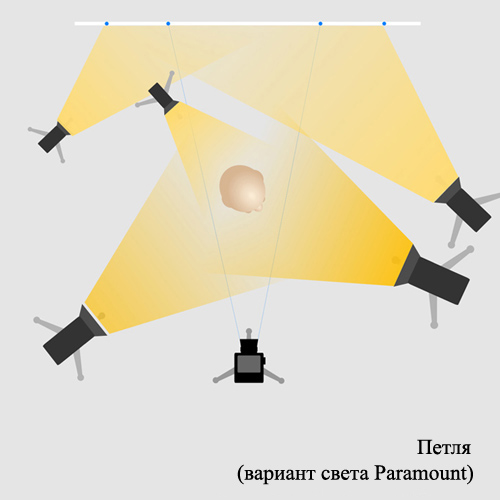
Loop (Paramount circuit variant)
This light pattern allows you to create a beautiful shadow on the model’s cheek, which is closest to the highlighting light. The key light should be lower than when used in the Paramount scheme and placed closer to the background. The fill light should be level with the camera, higher in relation to the main light and located opposite. Lighting Loop helps to widen the face and is suitable for working on narrow faces with ruddy skin. The loop from the nose area should not touch the shadow area of the side of the face. This is the most interesting lighting scheme. This lighting scheme creates an interesting three-dimensional effect on the model's face and body.
Short light - full illumination of the side of the face that is not directed towards the camera
Partial (narrow) illumination of the side of the face that is directed towards the camera. These patterns are useful when you are photographing wide faces. This is a very interesting and dramatic lighting scheme as the viewer sees more shadows. Also, this light sharpens the facial features a little.

3/4 light pattern
Light sources are located in 3 quarters: the universal location of the key light is suitable for various types of faces. Minimum illumination visually narrows the face. This is an acceptable lighting solution, even if the model turns her head to the side during shooting.
Rembrandt light (45 degree lighting)
Dramatic, “masculine”, mood light. A very interesting light scheme where the source of the highlighting light is placed at cheek level. It's not a bright light. On the shadow side of the face, a typical triangle of light is obtained.

Divided Light
This type of lighting creates an effect similar to a burning candle: only one part of the face is illuminated. The key light is at nose level. The fill light can be raised or moved closer to the camera. This is very effective for significantly “narrowing” the face and nose, hiding any facial defects.

Profile light
Lighting the profile/contour of the model. The key light (when photographing the model's profile) is placed behind the subject (the person is looking at the reflector or the key light source). Profile-edge. You must create outline lighting using a key light. When using a key light to highlight the haircut, raise the light source slightly to achieve the effect.
