Drawing of a radio-controlled gasoline-powered car. RC cars as a hobby. Rear axle with damping system
Buying a radio-controlled device today is not a problem. And a car, and a train, and a helicopter, and a quadcopter. But it is much more interesting to try to create a radio-controlled car with your own hands. We will provide you with two detailed instructions.
Model #1: What will we need?
To create this radio-controlled model you will need:
- A model car (you can even take an ordinary Chinese one from the market).
- ARU auto.
- Solenoid for opening the doors of a VAZ car, battery 2400 A / h, 12 V.
- A piece of rubber.
- Radiator.
- Electrical measuring instruments.
- Soldering iron, solder to it, as well as plumbing tools.
- Reducer.
- Collector engine (for example, from a toy helicopter).
Model No. 1: instructions for creating
And now let's start creating with our own hands radio controlled car:
Model No. 2: necessary components
To create a car you will need:
- Automobile model.
- Spare parts from an unnecessary collection machine, printer (gears, traction, iron drives).
- Copper tubes (sold in hardware stores).
- Soldering iron.
- Autoenamel.
- Bolts.
- Necessary electronics.
- Battery.
Model #2: Creating a Device
We begin to make a radio-controlled car with our own hands:

In conclusion, we present to you one of the drawings for radio-controlled car models - a receiver diagram.

A homemade radio-controlled car is a reality. Of course, making it from scratch will not work - develop your experience on simpler models.
With your own hands - for many, this phrase is associated primarily with a jigsaw for metal, a soldering iron and other "handmaker" tools. It is really possible to make your own model from absolute zero - turning every detail yourself - but this is a rather complicated, time-consuming and very demanding process on your own skills. Therefore, now we will talk about a simpler and more accessible option: how collect radio-controlled car at home.
How it works?
Modern radio-controlled models can be divided into two large groups:
- RTR. Completely ready to use machines. That is, I took the model out of the box, put the battery in - and forward to the races;
- kit. Delivery option for advanced users: instead of assembled car comes a set of spare parts, to which you add your own - custom - spare parts, as a result, assembling the model of your dreams on your own.
Note : the option in which you buy all the spare parts separately is not much different from. It’s just that you don’t use ready-made kits, but, nevertheless, you use factory parts.
Why do you need a do-it-yourself RC model at all? Exactly the same as any custom: to stand out in the crowd, to make your car unique. Moreover, assembling from finished parts is less demanding on skill than "file work".

What spare parts will be needed?
As a rule, if you have chosen some kind of Kit, then only the chassis and body are included in its package. Additionally needed ( Considering an electric machine):
- Engine;
- Radio equipment: control panel, receiver, telemetry;
- wheels;
- Battery;
- Discs, inserts, etc.
Ultimately, it all depends on the specific kit for assembling a radio-controlled car model with your own hands: some, for example, do not have a body, and it is purchased separately.
Is it difficult to assemble the Kit?
It is at the Kit assembly stage that there are usually no difficulties: the parts are numbered, they come with detailed instructions- do everything carefully, and there will be no problems. Difficulties most often arise when combining the chassis with other components, so once again we advise: before buying an engine and other spare parts carefully study the selected Kit and its characteristics. An excellent choice would be to read thematic forums: surely someone has already worked with this Kit - and, most likely, this someone will willingly share their experience.
Plastic or aluminum?
The answer to this question largely depends on the brand in question, but more on that below. If we compare "in a vacuum" - and good plastic with good aluminum - the picture looks something like this:
- Plastic: Lighter, absorbs shock better, recovers shape after collisions. But, at the same time, with too strong a blow, the plastic cracks and tears, it will be almost impossible to repair it - the part is to be replaced. In addition, the seats of the shafts and bearings become loose on plastic parts over time, which causes backlash - again you have to change the part;
- Aluminum. It is repairable and practically does not deform over time, but good aluminum costs more than good plastic. Bad aluminum is usually quite brittle and literally crumbles at a level of stress that high-quality plastic will not even notice. And it costs about the same.

Parts manufacturers
There are three most interesting brands:
- RPM. The best plastic on the market. Perfect quality, high strength, exceptional durability - what you need to make an indestructible rc model with your own hands. The brand has only two drawbacks: a high price and a clear sharpening for American cars like, most likely, RPM spare parts cannot be supplied to the “Chinese”;
- Integy. Aluminum parts, a good balance between price and quality. If you still prefer metal to plastic, it is quite possible to think about choosing this brand. And yes, aluminum looks great!
- Pro-line. Another great - and quite versatile - brand. The best choice if you are going to work with non-American Kit. Among the advantages of the brand: 5 years on the market, a lot of awards, a very wide range and an acceptable pricing policy.

General conclusions on do-it-yourself cars
If you carefully follow the instructions and take your time, there is nothing prohibitively difficult in self-assembly of a RC model. The main thing is to use high-quality components from a well-known brand, they fall into place seamlessly. Well, we recommend starting with Kit'a simpler, and then, having received the first experience, raise the bar of custom.
Instruction
To assemble the model, take a simple small electric motor with an axle that you will then put wheels on; a button from a computer mouse in two copies; a long enough wire and a body for a car that can be anything you want it to be.
Take two small wires and solder them to the button with a soldering iron. Solder the opposite end of one of the wires to the electric motor, and the other to the positive pole. The third contact will already be on the motor - the negative pole.
On a battery prepared in advance, connect the plus and minus. Take two batteries - one for each button. Make a remote control - the basis for batteries and buttons.
When everything is ready, make a body for the car, put wheels on the electric motor axles and check if the assembled structure works. When you press one button, the machine should go forward, and when you press the other - back.
Related article
Sources:
- how to assemble a car on the remote control
TVs with remote management long established in our homes. But sometimes you don’t want to part with the old device, in which there is no such function. A home master with the necessary skills can add a remote control to it.
Instruction
Many later unified black-and-white tube TVs allow standard wired remotes to be connected to them to control volume and brightness. In order to do this, it is necessary, first of all, when the device is turned off, to remove the plug-switch from the socket marked as "DU". It can be found both on the back and on the side of the TV. Be sure to keep this plug, because the machine will not work if neither it nor the remote control is in the slot.
Take three insulated shielded cables up to five meters long. Both at the beginning and at the end, connect their screens to each other. On the plug that is plugged into the remote control socket on the TV, bridge pins 3 and 5 between each other. Connect the braids of all cables to pin 1, the central core to pins 4, 6 and 7.
Assemble the remote control in a case made of non-combustible insulating material. Install two 470 kΩ variable resistors in it. Put wide insulating handles on their shafts.
For one resistor, bridge one of the extreme terminals with the middle one. Connect the place of their connection to the cable braids. Connect the remaining output to the central core of the cable going to the sixth pin of the connector.
At the other resistor, connect one of the extreme terminals to the braids, the central terminal to the central core of the cable going to pin 4, and the remaining extreme terminal to the central core of the cable going to pin 7.
note
The first tests of the aircraft are best carried out in calm, calm weather.
Useful advice
For high-quality gluing of ceiling tiles, "sand" its glossy surface.
Pasting the wing and stabilizer of the aircraft with adhesive tape, start from the trailing edge.
Sources:
- krestolet - homemade aircraft model from ceiling tiles
- airplanes on the remote control
Idea to make for your child typewriter With motor it will seem strange to many: what is the point of doing this if there are cars for every taste in children's stores. But if you want to prove yourself and get recognition in the eyes of the baby, then you should try, although this is not an easy task.

Instruction
The ideal option is a radio-controlled car. To begin with, you will have to acquire an assembly diagram and accurate drawings of the future model. You can not do without serious knowledge in electrical engineering, since the machine has a very complex device. Well, at the end of the preparatory stage, purchase all the necessary details.
Start with the control panel. The ability of the car to move, overcome obstacles, maneuver, etc. will depend on the correctness of its assembly. Car modellers usually use a three-channel pistol remote, which you can assemble yourself if you wish and have the opportunity.
An easier option is to buy a special designer, where there are all the necessary details with detailed diagrams and model drawings. Such constructors provide for the possibility of assembling up to several dozen different models.
Motors for radio-controlled cars can be either electric or internal combustion. Internal combustion engines, in turn, are gasoline and incandescent, running on a mixture of methanol, oil and nitromethane and a gas-alcohol mixture. The volumes of such engines range from 15 to 35 cm3.
The volume of fuel tanks can reach 700 cm3, which ensures the operation of the engine for 45 minutes in continuous mode. A significant part of the petrol models has a rear-wheel drive and an independent adjustable suspension is installed on them.
Today, there are many models on sale, specially designed for those who like to assemble gasoline cars on their own, manufactured by ABC, Protech, FG Modelsport (Germany), HPI, HIMOTO (USA), etc. The peculiarity of these models is that they are made on the basis of real-life prototypes. After the assembly is completed, install and charge the on-board battery, the battery in the transmitter, fill the tank with gasoline and go.
Related videos
Most modern toy cars with remote controls use a radio channel. This forces parents to purchase batteries for both the remote control and the toy itself. If the machine uses wired control, the batteries are inserted only into the remote control, and they are consumed only while driving, but not in standby mode, as with radio control.

Instruction
Take any spoiled typewriter on radio control. The main thing is that the engines and gearboxes are in good working order. Remove the rest from it.
Familiarize yourself with the device of the mechanical part of the toy. If it has one engine, it means that it is equipped with a special mechanism that makes it move forward when the motor rotates in one direction, and turn sideways in the other. If there are two engines, then one of them, depending on the direction of rotation, moves the model forward or backward, and the other, when voltage of one or another polarity is applied to it, deflects the steering mechanism in the appropriate direction.
If the remote control is also preserved from the toy, even if it has become unusable, use it as well. Use only switches from it, and remove the transmitter. True, a set of batteries to power the engines will not fit in it. Place it in a separate box. If the remote control is lost, assemble it yourself. To do this, you will need to take a suitable case, as well as one or two switches (according to the number of engines), each of which has a stable middle position and two unstable extreme ones. the number of switches, you can use it. In all cases, the switches must be such that at the moments of switching they do not occur even short-term short circuits of the extreme poles.
Use four AA batteries to make a bipolar power supply with two cells in each arm. If the motors are low voltage, use two batteries - one in each arm.
In a car with two motors in series with the one that controls the turn, turn on a flashlight bulb rated for the same voltage as one arm of the power source and a current of about 250 mA. This light will limit the current through the stalled motor in the extreme positions of the steering gear. It will also glow when turning.
Get a flexible cable. It must be two wire for single motor model and three wire for twin motor model. Its cross section should be, on the one hand, large enough so that significant stress does not fall on it, and on the other hand, small enough not to hamper the movement of the model.
For a single motor model, simply connect the cable to the motor. With a two-motor model, find the polarity where one motor makes it move forward and the other makes it turn right. Connect the outputs of the motors, which in this mode are connected to the negative pole, to each other, and then connect to one of the cable wires. Connect the remaining two wires to the remaining motor leads.
If the machine is single motor, connect one of the wires of the cable to the midpoint of the power supply, the other to the midpoint of the switch. Connect one of the poles of the power source to one extreme contact of the switch, the other to the other. Now in one of the positions of the switch the machine will go forward, in the other it will turn. If you want to swap the positions of the switches, swap the wires going to the extreme contacts.
If the machine has two motors, connect the common wire of the cable to the midpoint of the power supply, and the rest to the midpoints of the corresponding switch motors. Connect the plus of the power source to the extreme contacts of the switches, corresponding to movement forward and turn to the right, and the minus to the extreme contacts of the switches, corresponding to movement backward and to the left.
Get ready for the fact that the batteries in the arms of a bipolar power source will wear out unevenly, and you will have to change them in one and the other arm independently of each other.
Related videos
Typewriter on radio control- the dream of any child, and adults like to enjoy themselves in this way. Such a toy will give a lot of joy and pleasure. Few people know that such a device can be made independently. Enough to have necessary materials and some technical knowledge.

Instruction
Find on the Internet a diagram and dimensions for making a machine body. As a material for it, you can use the cover from the old system unit. Following the diagram, make the body of the car. Wheels can be made from plastic caps or other round objects.
Pick up additional details to decorate the car. You can use the elements of the old CD-drive. Side, windshield and rear windows are made of thin plexiglass. Next, get creative and give the car a more realistic look. If you think you can't make a quality case, just buy a regular toy typewriter required sizes.
Buy a small electric motor with an axle from a specialized store so that you can connect the wheels. You will also need batteries, a long wire and an unnecessary remote control. Take an old computer mouse and remove both buttons from it. Solder 2 small wires on one of them, lead one of them to the electric motor, and solder the second to the positive pole of the battery. It should be noted that the negative pole is located directly on the motor.
Reverse the steered machine. To do this, solder two wires to the second mouse button, similar to the first. After that, connect the "plus" and "minus" on the battery. Connect both mouse buttons to the remote control.
Put the wheels of the controlled machine on the axis of the electric motor. The performance of the device is checked by pressing the buttons from the computer mouse in turn. One of them is responsible for the forward stroke, and the second for the reverse.
Purchase a special board for working with IR ports if you want to get wireless control of the machine. In this case, the mouse buttons will be connected directly to the board and close the contact when a certain combination is pressed on the remote control. To set up commands, it is necessary to program the device with specialized applications.
Sources:
- make your own radio controlled car
During the game, the machine allows you to smoothly loosen the tension of the electric guitar strings. Some modern devices of this type also make it possible to increase the tension. The machine expands the range of artistic possibilities of the performer.

You will need
- - electric guitar;
- - machine;
- - strings of caliber 0.09-0.42 (9-42);
- - a set of 6-sided keys (supplied with a guitar or with a typewriter)
Instruction
Consider a machine. It consists of several parts. These are the support screws, the bed itself, the lever and the springs that regulate the tension force. Filly for strings are fixed on the frame. On the reverse side of the body of the guitar, fix the metal platform with petals with two screws. Springs are attached to these petals. Cars are of several types. For example, Strat Tremolo, Floyd Rose, etc.

One of the first machines - Strat Tremolo. It comes with 2 or 6 screws. Modern models have 2 screws. The same scheme is used in other, more complex models. They are configured according to the same principle, but they have additional functions. Adjust the height of the support screws so that the machine has free play. Their height should be the same. The screws must not be too high above the case. In this case, the strings will be at an excessive distance from the fretboard.
Install the bed. She has two cutouts in the body. They are called knives. These knives must rest against the support screws. Place the springs on the back of the guitar body. Initially limit yourself to two and secure them so that they are parallel to each other. There are special holes on the bed, into each of which the bent end of the spring is inserted. There are only five holes, insert the springs into the second and fourth. The second end of the spring is a ring. Fix them respectively on the 2nd and 4th petals of the platform.
Put the strings on the guitar. Set up the instrument. Ideally, the bed platform should be parallel to the body. If the bed is turned deep into the body, this means that the tension of the springs is greater than the tension of the strings. In this case, loosen the screws securing the platform by 1 turn. Tune your guitar. Check the position of the machine. Repeat the operation until you reach the desired position of the machine. In the opposite case, when the back side of the device rises too high above the body, tighten the screws a little. Having achieved the ideal position of the typewriter, adjust the height of the strings above the fingerboard by tightening the screws on the filly.

To check if the machine is holding the line, screw the lever into the specially provided hole on the bed. Gently rock the machine up and down, moving the lever towards and away from the body. Check the tuning of the guitar. Ideally, the system will remain the same.
Related videos
note
New strings have properties to stretch. The guitar is out of tune. Wait for some time for the final setting. Depending on the manufacturer and the quality of the strings, the time can be from an hour to a day.
The movement of the machine should not be too light or too heavy. If the machine dangles, put an additional spring. If the stroke is too heavy, use springs with less tension. If it costs more than two springs, try to remove one.
Useful advice
Pay attention to the manufacturer of the machine. Often you have to deal with cheap cars made of not the highest quality materials. In such cases, breakdowns, malfunctions are possible. Such machines can not keep the system well. If everything else about the guitar suits you, it is better to replace the typewriter with a better German, Japanese or American model.
Lubricate the undercarriage of the machine with technical oil.
Keys can be purchased at a hardware store or bike shop.
First of all, radio remote controls - the sea, and they can be purchased in many stores. The question is, how, for example, to make a pyrotechnic radio remote control for remote detonation of several charges at once? After all, such a device would be ideal for a festive New Year's piroshow.

Instruction
Get the so-called "radio remote control". It can be obtained in large construction hypermarkets, and it serves to ensure that without getting up from the couch, you can control any equipment in the house. It is inexpensive (about 400r), but there are a lot of benefits from it. Consider the Chinese Digital Remote Control Switch as an example.
Decide on the power supply that you will use for your future remote control. If it is 220V, then nothing needs to be redone, but usually the power comes from 9-12V, so you need to change the control unit circuit. To do this, disassemble the device unit and short-circuit the capacitor and inductor with a jumper. You can’t just connect the batteries, because the capacitor will not let direct current through them.
Reassemble the remote control receiver. From now on, he will be able to eat from a source of 9-15V. It can be either a battery or ordinary batteries. Remember that at a lower voltage, the relay will not work, and at a higher voltage, the microcircuit may burn out.
Choose a suitable plastic box, inside which will be located the control unit, wires and batteries. In the lid of the box, LEDs, a toggle switch and “tulips” for wires will be mounted. Place everything compactly inside and secure. So that nothing dangles inside, glue foam rubber to the lid.
Make markings in the cover for the seats of the parts and drill holes. Mount the "tulips" and connect them together. Solder to them a common negative wire coming out of the remote control.
Glue the LEDs. Direct one wire of the LED to the common wire of the control unit, and connect the second to the second contact of the "tulip". Solder 3 channels from the control unit here. Mount the toggle switch and connect it between the control unit and the power supply. Then neatly arrange the wires and close the cover.
Related videos
Not only kids love cars with remote management. Wire wedges were used by German and Japanese troops during the Second World War. Used such devices in Chernobyl. You can make such a control system from improvised means.

You will need
- - large machine;
- - 2 electric motors;
- - flexible multicore cable;
- - plastic box;
- - a sheet of plywood;
- - toggle switches;
- - buttons;
- - batteries;
- - reduction gear;
- - set of tools.
Instruction
Take a car with a swivel front axle. Otherwise, you will have to do it yourself. There is a wide range of such toys on the market.
Provide typewriter front and back. Connect an electric motor to one or both rear wheels through a reduction gear. Electric motors may be the same. They can be taken from old toys, tape recorders, CD drives, etc. Any small motor will do.
In the absence of a gearbox, put a plastic or rubber tube on the protruding section of the motor axis. A bicycle nipple will do. Install the engine so that the rubberized part of the axle is in frictional connection with the outer surface of one of the rear wheels of the car.
Choose the batteries so that the speed of the car is acceptable. He must not drive too fast, otherwise he will be difficult to control.
For the turning mechanism, cut a semicircle from a sheet of plywood or plastic with a diameter equal to the length of the front axle of the car. Usually steering toys are rotated completely, which somewhat simplifies the task of creating a rotation mechanism. On the underside of the vehicle, firmly fasten the semicircle to the axle mounting bracket so that it does not interfere with the rotation of the wheels. The semicircle must lie horizontally.
Depending on the design of the car, the second motor, that is, the control engine, can be positioned both vertically and horizontally. But it should be in the middle of the arc. It is important that its rubberized axis, as in the first case, engages with the outer arc of the semicircle or with the horizontal section closest to it. In the second case, it would be good to attach the engine so that the semicircle lies on top of the rubberized axle. Pick up batteries so that the turn is smooth.
Mount the control panel in a plastic box. Use 2 toggle switches with 3 positions (that is, those that have a central neutral position). In this design, the batteries are located in the car itself, so all you have to do is connect the control panel switches to the motors or batteries of the car with a flexible multi-core cable. This must be done so that at the neutral point of both switches, the power from the motors is turned off. When the drive switch is in the forward-reverse position, the polarity of the drive motor supply must be reversed in accordance with the position of the toggle switch. Similarly, the position of the left and right turn switch should change the polarity of the turn motor.
Related videos
Useful advice
It is very useful in the turning system to use limit switches or contact groups that would turn off the power to the turning mechanism in its extreme positions.
The car can be equipped with incandescent bulbs - direction indicators. They can be taken from a flashlight or a small Christmas tree garland. You can also use LEDs.
The design can be supplemented with a speed controller by installing a variable wire resistor with a resistance of 12-15 ohms in the remote control.
Lambrequin is a decorative drapery made of a fabric of a different color and texture, placed over the curtains. Attach it to the same cornice on which the curtain hangs. In its widest part, the lambrequin is 1/6 of the length of the curtain. This decorative element of the design of a window or doorway can be additionally decorated with tassels, flounces, or be assembled not into folds, but into puffs. Make a pelmet with your own hands pelmets pattern braid or strip of dense fabric. Collect a lambrequin from several swags, decorate it with ties, cascades or chill molds.
A modern person tries to provide himself with a comfortable existence as much as possible, not to expend effort where it is possible to use automation for this, operating from remote controls (RC). These devices have long been part of everyday life, they are equipped with all television receivers. Now such panels are also used to control the operation of lighting devices.

Advantages of luminaires with remote control
The use of a remote control that regulates the operation of lighting fixtures and, in particular, chandeliers, allows you to increase the safety of their operation, because you do not have to constantly use a switch that has unreliable contacts that can cause a short circuit. You don't have to crawl out from under a warm blanket after watching evening TV to walk across the bedroom to the switch - the remote is always at your fingertips. With it, you can also adjust the lighting - make it brighter or, conversely, dim it, if necessary, and also turn off some of the lamps, leaving the rest on.You can also program any lighting mode, save the algorithm, and use it when needed. If you have children, such a remote control will help turn off or dim the lights in the room without disturbing their light sleep. In addition, remote-controlled chandeliers are usually equipped with LED or halogen lamps, which, although more expensive than conventional incandescent lamps, last longer and consume less electricity. The remote control is easy to operate and even a child can handle it, its range is 100 m, and walls and furniture are not an obstacle to its passage.
Remote controls for chandeliers, just like televisions, operate on standard AA batteries. If the batteries have expired before you purchase new ones, the chandelier can be powered by a switch.
How to choose a chandelier with remote control
To begin with, you should know the general criteria for choosing lighting fixtures for a particular room in the apartment. One of the main components of any such device, including a chandelier, is a light source - a lamp. In chandeliers, both conventional incandescent lamps and compact halogen, LED or fluorescent lamps are installed. According to indicators such as efficiency, environmental friendliness and durability, LED light sources are beyond competition, despite the fact that their price is higher.An important criterion is such a characteristic as power, it is on it that the brightness of the glow and, consequently, the level of illumination, which refers to ergonomic indicators that determine comfort, depend. For rooms with different functional uses, the required level of illumination may be different. It is measured in lux and is usually given in technical documentation to the chandelier So, for rooms intended for classes or offices, the required level of illumination is about 400-500 lux; in the room where the simulators are located, this level should be 300, and in the toilet, dressing room and bathroom, 200 will be enough. But chandeliers are usually hung in living rooms, dining rooms or bedrooms, according to sanitary standards, the illumination level in these rooms should be about 200 , 250 and 150 lux respectively. Therefore, when choosing a chandelier for these rooms, pay attention to whether its power corresponds to the operating conditions.
Another important point is the quality of workmanship, on which both the service life of the chandelier and the compliance of the actual parameters of its operation with those indicated in the technical documentation depend. Here, Japanese, European and American manufacturers are beyond competition, but there are also quite competitive products made in China, while its price will be lower than that of famous brands. To make the right choice, you can study in advance
If you have been accustomed to “turning screws” since childhood, the designer was the best gift for you, and you prefer to repair a bicycle-moped-motorcycle or a car with your own hands, then this article will most likely reveal quite a bit of new things for you. Assembly radio controlled car not particularly difficult, in particular, if you imagine what and where should be, and how to work.
The same beginners who only approximately understand how it works and big car, and its reduced copy, this article will be extremely useful.
First of all, you need to decide on the purchase of the chassis. As mentioned in one of our articles, the cars come in RTR packages - fully assembled and ready for travel and in KITs for construction (which, in turn, are divided into three types, according to professional level).
Those who choose the RTR kit, do not think that the assembly is “over” for you and you can safely ride. Not at all. Optimally, you need to disassemble and reassemble your car! The fact is that the factory assembly is often “uneven” - somewhere the bolt is not tightened, somewhere there is no lock (Thread-Lock), perhaps the camber is done incorrectly or the gearbox gears are not set. Driving an untested car is a risk of breaking it on the first day. In addition, disassembly-assembly of the model is the best way to study it thoroughly. Therefore, be patient and carefully read this article, perhaps the information contained in it will be useful to you.
Check out the instructions and accessories!
Read the instructions that come with your model carefully. We will proceed from the fact that we have a KIT set in front of us, while the owners of the RTR model will simply disassemble (in reverse order) and then reassemble. Make sure you understand all the names and terms. Check the package, all parts available must comply with the specification.
Pay attention to the length of the bolts and screws in their location. Their length should be enough for reliable fixation. Remember, the manufacturer does not supply excessively long bolts and screws, as well as too short ones. If the bolt is longer than you need at the attachment point, then it's not from here! And somewhere else, he will be missed.
Do not confuse left and right side, front and rear nodes. You need to look along the way of the car, then all sides and parts will correspond to their correct installation.
For the assembly, it is best to allocate a spacious table and a table lamp for bright local lighting.


It is better to lay a light dense fabric on the table - all small details are clearly visible on it. In addition, we recommend that you have a low box with small compartments in which small parts can be laid out. Protect your assembly area from sudden intervention by small children and animals.
To work, you will need a set of tools:
Small pliers.
Screwdriver set with cross and slotted slots. You will need small to medium sized screwdrivers.
Side cutters are small. Pliers, side cutters, a nail file, a knife can replace a high-quality multitool.
Scalpel or special knife with replaceable blades.
Set of hexagons.
Caliper.
The assembly of the model should be done according to the instructions. It is not very difficult, but there are subtleties.
1. Details from the printed circuit board should be bitten off with side cutters, and then clean up the attachment point with a scalpel.
2. Bolts and screws must be tightened without overstressing. If you have difficulty driving a screw, lubricate it with soap (for this, get yourself a technical bar).
3. Use Thread-Lock (adhesive fixative) to prevent self-loosening of bolts and screws. As a rule, the instructions indicate where it is applied without fail. But, if you feel that some unspecified node can unwind, it is better to fix it. Typically, all bolt-nut connections secure Thread-Lock.
4.Lubricate the gears, but be smart! Do not lubricate bare gears, as dirt will immediately stick to them.
5. Check and set, if necessary, the gap in the main pair.

To check the gap between the gears, put a piece of paper between them and scroll the gear (should describe a full circle). If all the teeth are imprinted on the sheet, then the gap is set correctly. If there are gaps, you need to tighten the gears a little.
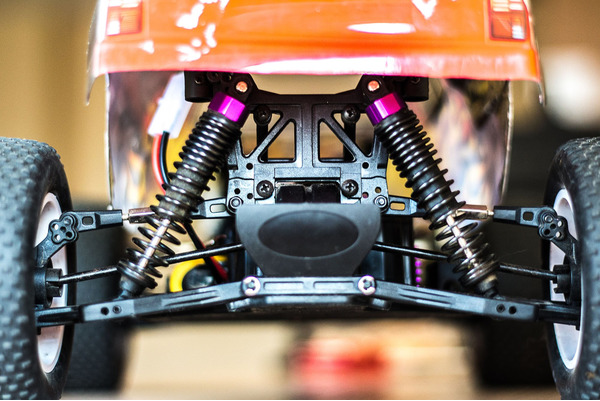
After assembling the chassis (assembly of the model - chassis, engine, transmission, etc.), proceed to install the equipment. Center the servos. To do this, you need to set the neutral position of the trims and turn on the transmitter and receiver (with the steering servos connected to it). The servos will immediately take the center position.
When mounting the receiver, try to install it as far as possible from the battery, speed controller, power circuits. Move the antenna also as far as possible from possible sources of radio interference.
Having decided to purchase a battery for on-board power, do not miss the voltage, size, number of cans.
When sticking rubber on wheels, be sure to wash off the factory preservative! Wash the rubber with soap and dry. Before gluing the rubber, apply risks to the discs (in the places of gluing), for example, with a large sandpaper.
If you have a directional rubber, make sure it is glued in the correct orientation.
In my youth, like any kid, I was very interested in radio-controlled cars. I remember how a neighbor's guy had such a car, how a line of the same boys lined up on the street who wanted to try to steer at least a little. It is clear that few people could afford such a luxury, but almost every one of us attended a circle of young technicians, where they were taught to design and create some models of technology. Do you remember how the editions "Young Technician" and "Technology of Youth" were ordered home, I still have packs of magazines in my dacha that I once reread up and down ... When in moments of idleness I open one of the magazines - nostalgia is a wave covers, it is simply impossible to contain emotions ...
My labor teacher knew how to do many things and gave us a lot, for which I am very grateful to him. I still remember our lessons - it would seem that we were given the most elementary knowledge, but how much they meant then! It is modern youth who do not appreciate what they are given at school and at the university - gaining knowledge has become something insipid and not at all valuable.
In the light of the innovative ideas of our teacher, some of us still tried to make something like a self-propelled vehicle. It turned out well, though few reached the victorious end. I, without bringing the idea to life, decided with my son to make a typewriter on the control panel. True, again, we did not reach the victorious ...
Our goal was:
1. Make your own radio-controlled model.
2. Use improvised means.
Here's what we settled on:


The steering wheel was also planned here, as you can see, control from independent suspension, fully homemade unit(wood, cardboard, wire, screw, rubber, glue were used). The son left, and we never made the machine. Just recently, again with nostalgia, I took it out of a deep box and thought that it would be worth doing all the same what was started. True, the whole mechanism is completely beyond my power, and there is no point in bathing - modern possibilities have decided everything for us - you can buy ready-made spare parts. So the only thing left is the motor, radio control and you're done! Soon it will look like this model))))))))))))

I took the photo from here: hobbyostrov.ru/automodels/, from where, in fact, I plan to buy radio-controlled parts for implementation in my car. Only vague doubts gnaw at me ... Is it worth taking a hand-made unit as a basis or buying a ready-made - not a radio-controlled car and making it radio-controlled. Or, as easy as shelling pears, go to the above site and buy a ready-made radio-controlled car - is it worth the bother? Because I have order with elastic guides, but there can be real problems with depreciation, durability, all-terrain ability.
Therefore, for the time being I am leaning towards the second option - as a basis, you can buy a designer and build a model to your liking, into which to introduce radio control. Still, a cardboard model is not so durable, and where will it be possible to lubricate the transmission in it?)))))) Moreover, on the same hobbyostrov.ru/ you can buy all the necessary spare parts.
In general, I will do it - I will show what happened. In the meantime, I would like to hear / see the experience of creating radio-controlled models, I'm sure that I'm not the only one who bothers with this. Maybe some specific advice?
I must say that today the market for radio-controlled cars is overabundant, but it is filled with models, usually made in China, although among them you will find a product for almost every taste. However, there are always craftsmen who are not satisfied with the current proposals or they believe that a radio-controlled car, assembled with their own hands, will always be better than even good conveyor copies. It is for beginner craftsmen that our article today is written. Let's start with the necessary tools, and then we will describe the workflow and give some useful tips.
How to build a radio-controlled car: tools
So we need the following:
- model of any car, even the simplest one, any production - even Chinese, even domestic, American or European;
- VAZ door opening solenoids, 12-volt battery;
- radio control equipment - AGC (not to be confused with Automatic Gain Control, since the abbreviation is the same);
- batteries with chargers;
- radiator;
- electronic measuring equipment;
- soldering iron with solder and metalwork tool;
- a piece of rubber (needed to reinforce the bumper).
Scheme of a radio-controlled car
Well, now let's move on to the scheme, that is, to the process of creating a high-quality model of a RC machine. To begin with, we assemble the suspension - for this we need a basic model and a 12 V battery. It will look something like this:
Now we take VAZ solenoids and plastic gears and assemble the gearbox. We cut the threads on the studs and the body so that the gears and solenoids can be hung. Everything should look like this:

Now we connect the gearbox to the power supply and check, after which we install the gearbox in the car if it passed the test. We install a radiator in order to protect the circuit from overheating. The radiator plate, by the way, can be very securely fastened with bolts. After that, we install the power driver and radio control chips. You can see them well in this photo:

Well, then we completely assemble the body of our car. After that, you can proceed to the test runs of the car. And now a few tips.
So, you have a radio-controlled car, how to make it agile and reliable? First, do not overload the model with unnecessary details and systems. Sound signals, glowing headlights, opening doors - all this, of course, is good and beautiful, but the creation of a radio-controlled car is already quite a difficult process, and its even greater complication can negatively affect the basic "driving" qualities of your model. Therefore, the main thing to concentrate on is to make a good suspension and ensure reliable signal transmission. Well, in improving maneuverability and optimizing speed characteristics, fine-tuning systems during test runs will help you. As for specific schemes, it is simply not possible to describe even a hundredth of them in this article, so I refer you to
Some people, even as adults, have not lost interest in different games. Someone collects a designer, someone plays board games, and someone really likes cars on the remote control. Of course, this hobby has a more adult character, compared to children's. And many fans of cars dream of getting into their collection such an exhibit that no one else in the world will have. Nothing is easier! Learn how to make a car on the remote control yourself.
First, you need to decide what parts will be needed to create a machine. So that you do not miss anything, below is a list of the necessary components:
- Electric motor or Gas engine
- Body
- Chassis
- wheels
- A set of screwdrivers of different sizes.
By making a machine with your own hands, you can control the entire creation process, which means that you will get exactly what you intended. Plus, you will save money, and if you put the business on stream, you can make good money on it. First decide on the amount of money you can spend to buy car parts. The cost of the same types of components may vary depending on the material and quality of the product. Do you want to make a car on a remote control with a wire or on a radio control? Here, when choosing, you need to consider that parts for a wired remote control will be somewhat cheaper.
Wheels and Chassis
Now you need to provide the chassis machine. You can try to make it yourself, but it is better to buy ready-made in the store. Moreover, wheels are sold along with the chassis. When buying, pay attention to the quality of the product. The front wheels should turn with ease, and rubber tires are best because they give the best grip.
Engine
Now you need to choose the engine of the car, and this is perhaps the most important thing, because the engine is the heart of the car. You can use an electric motor from some kind of equipment, and if there is none, then go to the store again. There you can also buy a gasoline engine, which is much more powerful. True, you need to take care of him, buy gasoline, and it costs an order of magnitude more expensive. So it is worth choosing an electric motor, and it will save you money and time.
Remote Control
Now it's time for the control panel. If you decide to make a car with a wired remote control, do not forget about its main drawback - the car will only move as far as the length of the wire allows. If your choice fell on radio control, then you need a radio unit to assemble the remote control. Despite the fact that it is not so cheap, it is better to purchase it, as this will allow you to control the machine at a fairly large distance that the antenna covers.
Body
The next step is the body. Here you can show all your creativity and make it yourself, having previously drawn sketches. Although, this part can be purchased at the store.
Assembly
Now we have all the necessary parts, and you can start assembling. As a rule, detailed instructions are attached to the components. The whole sequence of actions is described there. Then start adjusting the motor and installing the batteries and antenna, and only then you need to attach the body and chassis.
Now you know how to make a car on the remote control.
This article is a modeler's story about making a homemade radio-controlled model of a four-wheel drive car range rover from a plastic model. It reveals the nuances of manufacturing axle drives, installing electronics and many other nuances.
So, I decided to make a car model with my own hands!
I bought an ordinary bench model Range Rover in the store. The price of this model is 1500 rubles, in general it is a little expensive, but the model is worth it! Initially I thought about making a hammer, but this model is much more suitable in design.  I had electronics, well, I took some parts from a trophy called "cat" which I had not needed for a long time and was disassembled for parts!
Of course, it was possible to take other prefabricated models as a basis, but I wanted just such an off-road jeep.
It all started with bridges and differentials that I made from copper pipes and soldered with a regular 100w soldering iron. The differentials here are ordinary, the gear is plastic, the rods and drive bones are iron from the trophy. 
These tubes can be purchased at any hardware store. 
I took the differential gear from a regular printer. I didn’t need him for a long time and now I decided that it was time for him to rest.  Everything turned out pretty reliably, but it’s rather inconvenient to work with a soldering iron!

After I made the differentials, I had to close them with something, I closed them with pill caps.  And painted it with regular car paint. It turned out beautifully, although beauty is hardly needed for a trophy.
Then it was necessary to make steering rods and put bridges on the frame. The frame was included and to my surprise it turned out to be iron, not plastic.


It was not easy to do this, since the scale of the parts is very small and it was not possible to solder here, I had to bolt it. Steering rods I took from the same old trophy that I dismantled.

All parts of the differentials are on bearings. Since I made the model for a long time.  I also ordered a gearbox with a reduction gear, the gear will be switched on by a microservo machine from the remote control.

Well, in general, then I installed a plastic bottom, cut a hole in it, installed a gearbox, cardan shafts, a home-made gearbox, an ordinary collector engine for such a small model, it makes no sense to put a bc and the speed is not important to me. 
The engine is from a helicopter, but in the gearbox it is quite powerful.
 The most important thing is that the model does not move in jerks, but smoothly without delay, the gearbox was not easy to make, but I had a heap of details, the main thing is ingenuity.
The reducer was screwed to the bottom, it kept perfectly, but to attach the bottom to the frame I had to tinker.

 Then I installed electronics, shock absorbers, battery. At first I installed the electronics rather weak and the regulator and the receiver were a single unit, but then I installed everything separately and the electronics were more powerful.

.1390645053061.prev.jpg)


And finally, painting, installation of all the main components, decals, headlights, and more. I painted everything with regular plastic paint in 4 coats then painted the fenders brown and sanded the parts to give a shabby and worn look. 
 The body of the model and the color are completely original, the color was found on the Internet and the photo real car everything was done according to the original. This color combination exists on a real car and was painted in this color at the factory.

Well, here are the final photos. I will add a video with the test a little later, and the model turned out to be very passable, the speed was 18 km / h, but I did it not for speed. In general, I am satisfied with my work, and it is up to you to evaluate it.
 The machine is not large, the scale is 1x24 in size and there is the whole point of the idea, I wanted a mini trophy for myself.


The model is not afraid of moisture! Germetil himself simply varnished the electronics, very reliably, no moisture is terrible.
 Servo machine micro park from the aircraft for 3.5 kg.


The battery lasts for 25 minutes of riding, but I will install more powerful electronics and a battery, because this one is not quite enough.


Even the bumpers are the same as on the original. And fastenings on them too. The drive on it is not 50-50%, but 60-40%.

In general, the Range Rover turned out in a rustic style, I didn’t even think that it would turn out to be so high-quality to paint because I really don’t know how to paint, although there’s nothing difficult! .1390645295252.prev.jpg)

I forgot to add for the sake of beauty, I also installed a roll cage and a full spare tire. Spare wheel and frame were included with the kit.

More about radio-controlled models:
Misha comments:
Tell me how it works four-wheel drive, inside the bridge, what besides the razdatki be? There must be a steering knuckle after all.
Not only children are interested in toys now. Many adults buy exact copies of cars famous brands or looking for radio-controlled models of cars. Among the proposed range of toy stores, it is not always possible to find an option that will completely suit the client. In some cases, it is much better to make a radio-controlled car model yourself, your child will appreciate your efforts. A hand-made present from improvised means is much more valuable than a bright car bought in an expensive toy store.
You can make your own radio-controlled car using our sequential algorithm. Modeling from one finished car model to another is very similar to the actions of craftsmen in a car repair shop.
To create a controlled car with your own hands, you need to have the following elements:
- Electric motor;
- Small car body;
- Rugged chassis;
- Removable wheels;
- Mini screwdriver set;
- Detailed instructions for accessories.
Undoubtedly, self-collection of cars on the remote control has a lot of winning advantages, namely:
- Saving money, while you will have the model of the machine that you wanted;
- You can choose the model you need from the proposed range of spare parts and body types;
- You decide - to make a mini-car on a wired remote control, or use radio control, which will have to spend a large amount.
After you decide on the model, perform the following algorithm of actions:
- We select the chassis for our model, pay attention to the quality of all the small details. No inclusions and notches on the surface of the plastic should not be visible, the front wheels should move smoothly;
- When selecting wheels, pay special attention to models with rubber, since all-plastic models have a poor quality grip surface;
- Approach the choice of the motor with all seriousness, since this is the main heart of the mini-car. There are 2 types of mini-motors for cars - electric and gasoline. Electric motors are affordable and easy to use, they are powered by a battery, it is very easy to give a new charge. Gasoline options have more power, but they are more expensive and require delicate care. They need special fuel. For beginners in the field of modeling toy cars, electric motors are suitable;
- You need to decide on the type of control - wired or wireless. Wired control costs less, but the car will only move within a limited radius, while the RC model will move within range of the antenna. The radio unit is much more efficient for mini-machines;
- The body of the future car also deserves special attention. You can choose a ready-made case or make it according to your personal sketch.
After all the parts are purchased, you can start assembling.

We attach a motor and a radio unit to the chassis. We mount the antenna. Together with the accessories, detailed instructions for assembling the entire machine should be included. Setting up the motor. After everything is working properly, fix the durable body of the mini-car to the chassis. Now you can decorate the created model as you wish. Let's make a machine with a powerful motor.
Many will find the idea of assembling a car with a motor for their child very strange, since there are many ready-made options. But if you are striving to show individuality and earn authority in the eyes of your child, then you can take on the assembly of a car with a motor, although this is not easy to do, but the result will justify all efforts.

The best option is to start assembling a radio-controlled model. It will require certain skills and knowledge of small electrical engineering, because this mini-machine is a rather complex mechanism, despite its compact size. All important parts must be purchased.
We begin to study the control panel. The movement of the car, the ability to overcome obstacles, and make beautiful maneuvers directly depend on the correct assembly. Many car modellers use a three-channel pistol-type remote control, which you can assemble yourself.
You can follow a simple path - get a special designer, where the kit contains all the necessary details, their detailed diagrams and final drawings of finished models.
Engines for future radio-controlled models can be electric or internal combustion. Internal combustion engines produce gasoline or incandescent, operating on the composition of methanol, oil and nitromethane, a special gas-alcohol mixture. Approximate volumes of such engines range from 15 to 35 cm3.
Approximate volume fuel tank for such machines is 700 cm3. It provides the engine with uninterrupted operation for 45 minutes. Many petrol models are rear-wheel drive and have independent suspension.
Today on sale there are many collapsible models designed for car modellers. Among the leading manufacturers of mini-cars, it is worth highlighting ABC, Protech, FG Modelsport (Germany), HPI, HIMOTO (USA). Their main feature is the similarity of mini-models with real prototypes. After completing the assembly, according to the attached instructions, install a charged on-board battery, a battery in the transmitter, pour a small amount of gasoline into the tank. You can safely launch your iron horse let's hit the road.
Modeling cars on your own is an exciting hobby, especially when the result exceeds all expectations. First you need to purchase a bench model of the Range Rover, from which we will make a jeep that freely dissects off-road. We also need to take working electronics from an old jeep, we will fix it in an SUV.
We make bridges and differentials from copper pipes with a soldering iron. We attach it to the powerful wheels of an SUV. Make sure that all connections are firmly soldered. We closed the sharpening differentials with pill caps. From above, we cover the entire junction of the differential with ordinary car enamel. We put bridges on the frame and perform tie rods. Tie rods can be taken from an old disassembled machine. After installing the plastic bottom, we cut out a hole there necessary for installing the gearbox, cardan shafts. In the gearbox there is an engine from an airplane, also quite powerful. The model does not move in jerks, but smoothly, this is the most important condition for such models. Making a gearbox is quite difficult, but here you can show all your ingenuity. We fix the gearbox tightly to the bottom, we fasten the bottom to the frame. Now comes the installation of electronics, shock absorbers, battery. At the end, there is painting the body of the car, installing the main components, headlights and much more. We apply the paint in 4 layers for ordinary plastic. The author found the original photo of the car and made a mini-copy of it in a toy version. So that the model is not afraid of moisture, he covered the electronics with a special compound. To give the effect of antiquity, I sanded the outer surface of the car after painting. The battery in this model is enough for 25 minutes of continuous riding.

To create such a simple model, we need the following list of small parts:
- Microcircuit for a radio-controlled car;
- Remote Control;
- Steering element;
- Soldering iron with solder;
- Compact electrical device;
- Battery with charger.
The procedure for this is as follows:
- We assemble the lower part of the car, that is, the suspension;
- For this purpose, a strong plastic plate is required, it will be the basis for this model;
- A microcircuit for a radio-controlled car is attached to it, we solder a wire to it, which serves as an antenna;
- Solder the wires from the electric motor;
- We fix the battery wires to the correct points of the microcircuit;
- We fix the wheels taken from a simple children's car;
- All parts can be fixed, so long as they do not fall off during use.
We fix the steering elements, it is impossible to do this with glue alone. The front axle must be wrapped with electrical tape for a stronger fixation. We fix the battery on the microcircuit. Now the machine is ready for testing. It must definitely function. The control of such a machine is carried out using a remote control. Following this instruction, you can easily make a new machine on the control. If you want to design with your own hands, then this guide is more than ever useful. A hand-made toy pleases much more than a hand-made model.

To assemble this model, we need the following components:
- A simple model of a machine of any production;
- VAZ parts for opening doors, 12-volt battery;
- Equipment for the organization of radio control;
- Durable batteries with chargers;
- Radiator;
- Electronic measuring equipment;
- A small soldering iron with solder;
- Locksmith fixtures;
- A piece of rubber to provide reinforcement to the bumper.
An approximate scheme for collecting a radio-controlled model is shown in the figure.

We turn to reading and collecting the scheme, to the exciting process of creating a unique mini-car. First, we collect the suspension. We take VAZ connections and gears to assemble the gearbox. The studs and housing need to be threaded to hang the gears and solenoids. We connect the gearbox to the power supply, check it, and then fix it on the machine. To effectively protect the system from overheating, we install a radiator. The plate from it can be firmly fixed with ordinary bolts. Next comes the installation of power driver chips and radio control. We completely install the body of the car. Our mini car is ready for the real test.

Do you have a radio controlled car? Do you want to make it more maneuverable, but don't know how to do it?
Do not overload the model with additional systems and unnecessary small details. Sound signals, luminous headlights are all conveniences, they look great, but the independent process of assembling a radio-controlled car already has certain difficulties. The complication of details can adversely affect important running gear auto. The main point that you need to focus on is the creation of a high-quality suspension, ensuring reliable signal transmission.
To improve maneuverability and optimize speed parameters, fine-tuning the system during test runs is suitable. These recommendations will help you understand the business of automodelling. You can independently create a machine that will be a real copy big model. All the details will be similar, only your version will have everything in a mini format.

Make your son happy - make a car with him on the remote control
You can start with a simple one - to assemble a machine-designer on the remote control. First you need to come up with a project: how your car will look like, how it will move, view other details. To start immediate assembly, you need to prepare not only all the important components of the future iron horse, but also the necessary fixtures. To start an exciting joint lesson with sons, we take the following things:
- A small motor can be borrowed from an old vein or household fan;
- Sturdy frame;
- Mini rubber kit;
- Quality suspension for a small chassis;
- 2 strong axles for fixing the wheels;
- Wireless antenna;
- Thin wires for connections;
- High-quality batteries for the battery or special gasoline;
- Assembled signal receiver;
- An old control panel, a simple transmitter or an outdated radio unit will do.
From the devices you will need pliers, a small soldering iron, screwdrivers of various diameters.
Assembly order
During the collection process, it may turn out that some of the missing parts will have to be bought in addition or borrowed from the son's old, broken cars. After all, he will sacrifice them for the sake of a cool novelty, right?! We take the frame and body from the old samples of my son's toys. The selected motor is pre-tested for maneuverability and performance. The power of the engine should not go against the weight of the machine, because a weak motor will not pull a heavy structure. Batteries must be unused. The assembly steps are as follows:
- First, we assemble a mini-frame;
- Then we fix and adjust the serviceable motor;
- We introduce batteries or a compact battery;
- Next, the antenna is fixed;
- The wheels are mounted so that they can turn freely, spinning along with the axle. If this condition is not met, the machine will only move forward and backward.
For the future iron horse, it is better to take rubber tires, as they perform best on open ground. If the assembly process was easy enough, you were able to understand all the intricacies of the initial auto-modeling, then you can make several samples, you can give another copy to the neighbor boy. They will arrange races on the open ground on the street.
Assembling a new unique car is an exciting process that dad and son can spend more than one evening behind. To turn it into a productive business, you can follow the following recommendations, they must be taken into account when assembling a modern toy:
- Make a sketch of the future model that you want to assemble or use the ready-made assembly instructions;
- Get all the quality parts of the machine;
- Additional parts can be taken from old machines or purchased new ones;
- Before installation, carefully test the selected motor, this is the heart of the machine;
- Don't skimp on batteries for a new model, keep them new and unused;
- Firmly fix all the details, according to their sequence;
- Study the schemes for creating similar machines in advance to facilitate the assembly process;
- Choose a ready-made model or come up with something of your own, unique.
Following these recommendations, you and your child can easily make the selected model of the machine. It is possible to make and collect replicas of original cars when you reach a certain skill level. Putting together a car in the family circle is the best way to effectively organize leisure for yourself and your child.
The machine, assembled with your own hands, will be a valuable present for your children, because real paternal feelings are invested in it. When assembled, the model will drive in the chosen direction and is easy to maneuver. You can learn how to make a simple version of the machine by following the recommendations from the proposed video. Start your journey in the world of car modeling!