Braking system in the Chevrolet Niva. Let's talk over the brakes Purpose and operation of the pressure regulator
"The sorcerer", or, according to the catalog, the pressure regulator in the drive of the brake mechanisms, it is not for nothing that the people have received such a well-aimed nickname: how it works, no one really knows, but, they say, being faulty, it is able to present an unpleasant surprise - to make the car dance in case of an emergency braking. This is the insidiousness of the "sorcerer": during normal operation, without braking to the floor, his work or inaction is practically not felt, but when his help is especially needed, you can not wait for it. The pistons have acidified, the rod or the drive lever has broken off, or you have installed a new one instead of the faulty regulator, but for the time being you do not know that the unit is defective or misaligned ... How dangerous is it?
Let's check in our experiment how "witchcraft" affects the efficiency of brakes at partial and full load of the Chevrolet-Niva and Kalina, and what the owner should be afraid of, who does not monitor the state of the regulator. The malfunction, from excessive activity to complete inactivity, will be simulated by adjustments. Recall that the regulator's task is to reduce the braking force on the rear axle, reducing the likelihood of skidding when braking to a skid. The regulator, mounted on the body and connected by an elastic lever to the axle beam, limits the pressure in the rear brakes depending on the position of the rear part of the body relative to the road, that is, on the vehicle load.
"CHEVROLET-NIVA"
By the way, before testing tires on cars without ABS, every time we adjust the regulator a little, taking into account the condition of the road (snow, ice, asphalt), trying to lock the rear wheels a little later than the front ones. Let's not break the tradition. Our "Shniva" had a 16 mm gap between the jaws of the regulator, which was set by the stop screw.
Several brakes, and the braking distance from 80 km / h for a car with a partial load is determined: 34.4 m. With a full load ... 33.6! Almost a meter shorter! At the same time, the driver noted the heavier pedal and the rapid heating of the brakes, which required cooling before each measurement. Let's remember these parameters and make adjustments to the adjustment of the "sorcerer". First, let's reduce the gap to 8 mm. The regulator now significantly limits the pressure in the rear brakes, transferring almost all of the work to the front.
It has become more difficult to brake, it is not so easy to keep the front wheels from slipping into skid - they are blocked very abruptly and the car naturally loses control. However, the result, to our surprise, is the same as in the basic version: 34.4 m.
At full load, you have to press on the pedal much harder, the front brakes begin to overheat. The result is 37.8 m. This is 4.2 m more than the basic setting (33.6 m).
The third state - we reduce the influence of the regulator, increasing the gap from the initial one also by 8 mm, that is, we set it to 24 mm. When there are two in the car, the braking distance practically does not change - 34.3 m. However, now the rear wheels are blocked. But at full load, the braking is very effective, the deceleration is easy to control and the result is a record: only 30.8 m!
In the normal position of the regulator, with an increase in the mass of the car, its braking distance decreases - more complete use of the adhesion weight by the rear wheels affects. The best braking is at full load, when the regulator minimizes the pressure in the rear brakes. However, at partial load it is fraught with skidding. The high center of gravity and the short wheelbase of the Shnivy contribute to a significant redistribution of masses during braking, so at partial load the rear axle does not contribute much to braking.
"LADA KALINA"
We set the regulator so that the tail is a little late with the wheels locking. With this setting and partial load, the car needed to stop only 27 m. Fully loaded - 29.5 m. There are slight difficulties with preventing the front wheels from slipping into skid. We reduce the gap in the regulator to zero - the half-empty Kalina stops after 31.8 m. The braking distance is increased by 4.8 m, accompanied by a sharp blocking of the front wheels. Loaded brakes after 35.2 m, the deterioration is even greater - 5.7 m! The pedal effort is increased, the brakes are noticeably hot.
Now we move the adjuster so that the rear brakes work as efficiently as possible. At partial load, the rear wheels are abruptly locked and the car is pulled off course - you have to release the pedal. It is very difficult to slow down on the verge of blocking. The result is 30 m, which is 3 m worse than the “norm”. Full load gave a result of 26.9 m, which is 2.6 m better than the base one (29.5 m). There are no comments regarding deceleration control.
In the basic position of the governor, the braking distance increases with increasing load. At partial load, the spread of results is 4.8 m, so the basic position is most effective. When you deviate from it in any direction, the braking distance increases.
On a fully loaded car, depending on the position of the regulator, the spread of the braking distance is 8.3 m. The best results, as on the Niva, are when the pressure in the rear brakes is increased. However, on a slippery road, even in smooth cornering, early locking of the rear wheels is possible, leading to a skid. And at partial load with a regulator position different from the base one, the braking distance only increases.
"KOLDUN" OR ABS?
And yet such a regulator on a modern car is a deep legend of antiquity. With ABS, he cannot compete, especially if the average driver is behind the wheel who does not know extreme driving techniques. The curb weights of "Kalina" and "Priora" are almost the same - the difference is less than a percent. On the same tires that were on the Kalina, the Priora with ABS showed the best results at any load. Moreover, no dosage of effort on the brake pedal was required, you just press from the heart, and the rest is done by electronics.
The optimal adjustment of the "sorcerer" corresponds to the average factory settings, and a few percent can be won only with individual adjustments for specific brake pads, tires, vehicle load and road conditions. Only hardly anyone will start every trip with a test run.
It would seem that it is possible to reduce the braking distance by increasing the pressure in the rear brakes, but this threatens with loss of stability due to early blocking of the rear wheels. And only ABS can provide maximum braking performance today.
Reading 2 min.
Today's article is about the Chevrolet Niva and its brakes. Consider the nuances of operation and repair.
The Chevrolet Niva is the product of a joint development of the two companies, and a car came out that is comfortable enough and completely ready to drive on our roads. This amazing synthesis is very widespread in our country and is quite satisfactory for most of our consumers. Today we are interested in the braking system of this car, which is designed for off-road driving conditions and the shortest possible distance when braking in urban driving conditions. Let's figure out what systems are installed here and how the mechanisms differ from others.
General device
Chevrolet Niva combines two subsystems. Each brake system has its own purpose, they are called:
- Working.
- Parking.
The purpose of the latter is very clear, this braking system ensures that the Chevrolet Niva Jeep is kept in one position when it is parked on uneven surfaces for a long time. The braking system, called the working one, is regularly used when the car is moving. With its help, the driver slows down at traffic lights and stops the car wherever he needs it. You can control its operation using the foot pedal, which is located to the left of the gas pedal and to the right of the clutch, if there is one, of course.
Principle of operation
On the Chevrolet Niva, it was decided to use a standard hydraulic drive for the system operation and a combined mechanism. A disc brake was installed on the front axle, and a drum brake on the rear axle, as in the classic version of this car. But, unlike the original version of the car, the drive was modified. This braking system has received a vacuum amplifier applied to the pedal force and an improved master cylinder.
The disc mechanism of a Chevrolet Niva car has two main parts: a disc and a caliper. The disc has a tight engagement with the wheel hub and rotates with it, that is, the disc is a movable element. The caliper is mounted on a special bracket above the disc. Pads and working cylinders are inserted inside it, which press the pads against the disc. The drum is of a slightly different design, here the moving part is performed by the drum body itself, which hides wider pads inside itself. Here, too, the working cylinders press the wider shoes against the horizontal plane of the drum. This design has a higher efficiency due to wider and longer pads. In addition, all mechanisms are hidden inside the drum and are completely protected from external influences. This is very convenient if the machine is frequently used in off-road driving conditions.
Checking and adjusting the brake system Chevrolet Niva
Checking the tightness of the hydraulic drive
Check the tightness by visual inspection:
from above from under the hood;
from the bottom of the car (on a lift or observation ditch);
from the sides with the wheels removed.
Inspect the pressure part of the hydraulic actuator with an assistant. He must press the brake pedal 4-5 times (thereby creating pressure in the hydraulic drive) and keep it pressed while you inspect the hydraulic drive. Inspection of a non-pressurized hydraulic actuator is acceptable, but less effective.
If you find leaks in the connections, tighten the clamps, plugs, nuts.
Replace mechanically damaged hoses and pipelines.
If you find leaks in the wheel cylinders, repair or replace the cylinders.
You will need: a "15" wrench, a special wrench for the pipe fastening nuts or a "10" wrench.
This is what a special wrench for pipeline fastening nuts looks like.
1. Inspect the master cylinder reservoir,
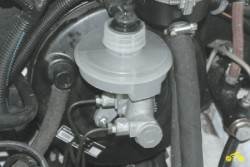
2. connections of pipelines to the master cylinder.

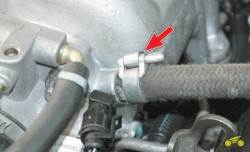
3. Check for fluid leaks in the brake pipe connections with tees,

4.with pressure regulator. If a leak is found, tighten the tips of the brake pipes (use a special wrench).

5. Carefully inspect the brake hoses. They should not have cracks, tears and rubbing marks. Press the brake pedal fully down. If there are bulges on the hose, it means that the braid threads of the hose are torn and it must be replaced.

6. Check the fastening of the pipes in the holders. Looseness or breakage of the holders leads to vibration and, as a result, to pipe breakage.

7. Check the condition of the pipes on the rear axle housing.
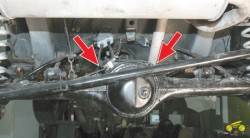
8. Inspect the connection of the hose to the wheel cylinder, the air outlet of the front brakes and

9. rear wheels.

Checking the efficiency of the vacuum amplifier
If the vacuum booster fails, the effort on the brake pedal increases significantly, which negatively affects driving. If the effort on the pedals during braking increases markedly compared to normal, check the brake booster while the vehicle is stationary.
You will need: a screwdriver, a rubber bulb.
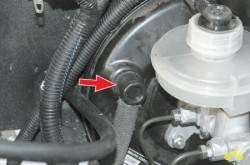
1. With the engine off, press the brake pedal 5-6 times. Keeping the brake pedal depressed, start the engine. The brake pedal should move forward. If it doesn't, check

2.the tightness of the vacuum hose on the inlet pipe fitting and
3. on the check valve. If necessary, depending on the defect, tighten the hose clamp, replace the clamp or hose.
Loosening of fasteners, damage to parts are not allowed. Tighten loose fasteners, replace damaged parts.
4. To check the check valve, disconnect the vacuum hose from the valve.
5. Remove the valve from the amplifier housing.
6. Place a rubber bulb on the larger diameter fitting (which inserts the valve into the amplifier) \u200b\u200band squeeze it. Wherein

7. the air must escape through the valve. Let go of the pear. If it remains compressed, then the valve is working properly. Otherwise, replace the valve. In the absence of a pear, you can blow the valve with your mouth.

Checking the degree of wear of the brake pads
If during braking the car is pulled to the side or there is an abnormal noise, check the condition of the brake pads.
1. Place the vehicle on a lift.
2. Remove the front wheel.
3. Check the condition of the pads through the hole in the caliper housing. If the thickness of the friction pads is about 1.5 mm, replace the pads.

4. To check the degree of wear of the rear brake pads, remove the rubber plug from the hole in the brake shield and
5. Inspect the pad pads.

Replace the pads in the following cases:
lining thickness less than 1.5 mm;
the surface of the linings is oiled;
the pads are loosely connected to the base.

Checking and adjusting the pressure regulator
If the pressure regulator malfunctions during heavy braking, the rear wheels may lock earlier than the front ones, which will lead to a skid.
Check the pressure regulator with an assistant from underneath the vehicle on a lift or inspection ditch.
You will need: a screwdriver, keys "10" (two).
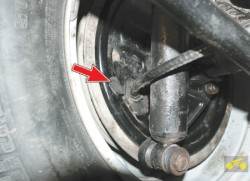
1. By visual inspection make sure that the pressure regulator and its drive parts are not damaged, there is no brake fluid leakage.
2. Ask an assistant to press the brake pedal.
3. When the pedal is pressed with a force of 70-80 kgf, the piston should move out of the body, twisting the torsion arm.
To visualize piston movement, insert a screwdriver between the adjusting screw and the piston arm. The screwdriver will move as the piston moves.
4. If the piston remains stationary when the brake pedal is depressed, the pressure regulator is defective and should be replaced with a new one.
Adjustment of the rear brake pressure regulator drive is necessary when loosening the bolts of its fastening, as well as after any work related to removing the rear axle beam, replacing the springs and shock absorbers of the rear suspension.
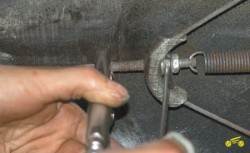
5. To adjust, hang out the rear axle of the vehicle.
6. Loosen the locknut 1 of the adjusting bolt 2.
.jpg)
7. Turning the adjusting bolt with a wrench 1, achieve a light contact of the bolt with the lever 2 of the piston.
.jpg)
8. Turn the adjusting bolt one turn and tighten the locknut.
9. With the correct adjustment of the rear brake pressure regulator drive, the rear wheels should be blocked during hard braking a little later than the front ones.
Carry out the check when braking from a speed of 30-40 km / h.
Checking and adjusting the brake pedal free play
If the free travel of the pedal is greater than the norm, the effectiveness of the brakes decreases due to a decrease in the full travel of the pedal. With an excessively small or no free stroke, spontaneous braking and heating of the brakes may occur.
Free travel of the brake pedal with the engine off should be 3-5 mm.
You will need: stop, ruler, 19 key.
1. Place a straight edge next to the pedal end on the floor, centered in the middle of the pedal pad. Mark on the ruler or memorize the position of the pedal.

2. Press the stop (you can use the hammer handle) on the pedal, moving it until a noticeable increase in the movement force appears. Determine on the ruler the movement of the pedal, which will be the free travel of the pedal.

3. If the free travel of the brake pedal is out of range, adjust it by loosening the brake light switch fastening nut and

4. twisting or unscrewing the switch in the bracket (with a large free stroke, screw the switch into the bracket towards the pedal; with little or no free stroke, unscrew the switch from the bracket, moving it away from the pedal).

5. Check the brake pedal free play again. Tighten the brake light switch retaining nut.
6. Connect the wires to the switch (if they were disconnected) and check the operation of the brake lights.
Checking and adjusting the parking brake
The parking brake should hold the car on a slope of 25% when the lever in the car is moved by 7-9 teeth (clicks) of the ratchet device.
1. To check that the parking brake is correctly adjusted, look for an overpass, loading ramp, etc. near your parking area. height H \u003d 1.25 m with an entrance length L \u003d 5 m. This ratio corresponds to a slope of 25%.

2. In the absence of such a ramp for the simplified parking brake test, park the vehicle on a level surface. Put the gear lever in neutral position, raise the parking brake lever in the passenger compartment completely. Get out of the car and try to move it. If you succeed, you need to urgently adjust the parking brake actuator.
Adjust the parking brake actuator from the bottom of the vehicle installed on a lift or inspection ditch.
You will need: two keys "12", pliers of the "cobra" type or pliers.
1. Hold the adjusting nut with a wrench 1 and loosen the lock nut with a wrench 2.

2. While holding the cable with pliers, tightening or unscrewing the adjusting nut, achieve 7-9 clicks of the lever travel.
3. Tighten the lock nut.
4. Perform several full strokes of the lever, then lower the lever until it stops.
5. Turn the rear wheels by hand. They should rotate evenly, without jerking. Otherwise, repair the parking brake actuator or the rear wheel brakes.
Checking the effectiveness of the brake system
It is advisable to check the efficiency of the brake system on special brake stands (similar to those used by the traffic police during the annual technical inspection of cars). In an extreme case, an approximate comprehensive assessment of the operation of the braking system can be carried out on a flat horizontal area closed to traffic. It is desirable that the site be covered with a thin layer of sand.
Drive the vehicle without load (excluding the driver) in first gear to a speed of about 15 km / h. Press the brake pedal sharply so that the wheels lock, and do not release the pedal until the vehicle comes to a complete stop.
Get out of the car and look at the brake marks left by the car's wheels. If the brake tracks of the front wheels are slightly longer than the rear wheels, while the length of the tracks on the left and right are the same, then the brake system is working properly. Otherwise, repair the system.

The following relationships must be observed:
L lion. lane \u003d L right. per.
L lion. rear \u003d L right rear
L front\u003e L rear
Do not overuse this assessment, because it is associated with increased one-sided tire wear.
The Chevrolet Niva brake system, as a product of a joint production of two world companies, is well adapted to Russian roads and has a minimum braking distance when driving in the city. What are the features of this system?
The machine has two independent brake systems - a working hydraulic system and a parking mechanical system.
The parking brake is applied during a stop to lock the vehicle in place. It uses brake pads only on the rear wheels and is operated by a lever located in the cab. When the lever is set to the upper position, the brake pads move apart and are firmly pressed against the inner surface of the brake drums, firmly fixing their position. The movement of the pads is provided by a cable and drive levers.
- contour "right front-left rear";
- contour "left front-right rear";
- master cylinder reservoir;
- the main cylinder of the hydraulic brake;
- vacuum amplifier;
- brake pedal;
- rear brake pressure regulator;
- parking brake cable;
- rear wheel brake;
- parking brake adjusting tip;
- parking brake lever;
- front wheel brake
Working hydraulic system design
The hydraulic braking system of the Chevrolet Niva is built on a double-circuit diagonal scheme in order to increase the reliability and safety of control. The first hydraulic drive circuit drives the front right and rear left wheels, while the second drive drives the front left and rear right wheels. Thus, controllability is maintained in the event of failure of one of the hydraulic drive circuits. The hydraulic braking system includes:
- a brake pedal located in the cab under the driver's right foot;
- vacuum pedal pressure booster;
- master cylinder with a reservoir for filling brake fluid;
- double-circuit hydraulic drive pipeline;
- working brake cylinders of the rear and front wheels;
- pressure regulator with drive lever.
The pressure of the driver's foot on the brake pedal is amplified by a vacuum booster and transmitted to the piston of the master cylinder, which, as it moves, compresses the brake fluid. The fluid pressure increases and is transmitted through pipelines to the working cylinders of the front wheels and the brake pressure regulator of the rear wheels. The pistons of the front calipers and rear working cylinders under the pressure of the brake fluid extend and press the Chevrolet Nivak brake pads on the surface of the discs and drums, slowing down their rotation.
Purpose and operation of the pressure regulator

The pressure regulator ("sorcerer") is designed to prevent the car from skidding during heavy braking. This is achieved due to the fact that the rear wheels start to brake after the front. The time delay is provided by the regulator lever, which, when the machine is suddenly decelerated (the nose goes down and the rear rises), pulls the piston in the regulator cylinder and closes the fluid supply channel to the working cylinders of the rear wheels.
At the same time, the rear brakes do not apply and the wheels rotate until the rear of the car drops back. Thus, the "sorcerer" automatically adjusts the fluid pressure in the rear cylinder path, inversely depending on the load on the rear axle. In addition, it increases the braking performance of an empty vehicle when the front axle load is higher than the rear axle.
If the car does not brake effectively, skids or drives it to the side, then this is a reason to check and adjust the regulator.
This work must be carried out at every service and after repair of the rear suspension.
Chevrolet Niva brake pads

Disc brakes are used on the front wheels of the Chevrolet Niva, and drum brakes on the rear wheels. Accordingly, the pads on them are different. The pads are the main working part of the brakes, which carry the most load and wear out the fastest. With intensive vehicle operation, the condition of the pads should be checked at least once every six months. Today there are many different domestic and foreign manufacturers of pads for Niva-Chevrolet cars.
They differ in price, material, service life. The most effective and "cool" are the so-called "kevlar" pads of the Japanese company NIBK. They are made using modern nanotechnology from a compound that is equally effective in various operating modes. The advantages of this model of pads include:
- low heating temperature during braking;
- do not require warming up in winter;
- do not squeak or squeal even with sudden braking;
- have a longer service life compared to other models.
The disadvantages of these pads include only the high cost, but the price corresponds to the quality.
If you are looking for information on replacing front pads, this is for you.